If you grew up in the 80s, you're probably familiar with the old school gaming consoles and of course, old school games like 'Super Mario Bros' and 'Donkey Kong'.
Nintendo was -- and still is! -- one of the biggest video game companies in the world, thanks to the popularity of its catalogue.

The Japanese company, in collaboration with LEGO, has recently launched several Super Mario interactive playsets, and that further reminded every 80s kids' about the hours they spend in front of their TV trying to defeat Bowser and rescue the princess.
So, imagine our surprise when a huge box of LEGO was dropped off on our doorstep one fine day.
It turns out, it was the LEGO Nintendo Entertainment System (NES) set; something that we personally know very well because we're huge fans of 'Super Mario Bros' back in the day.
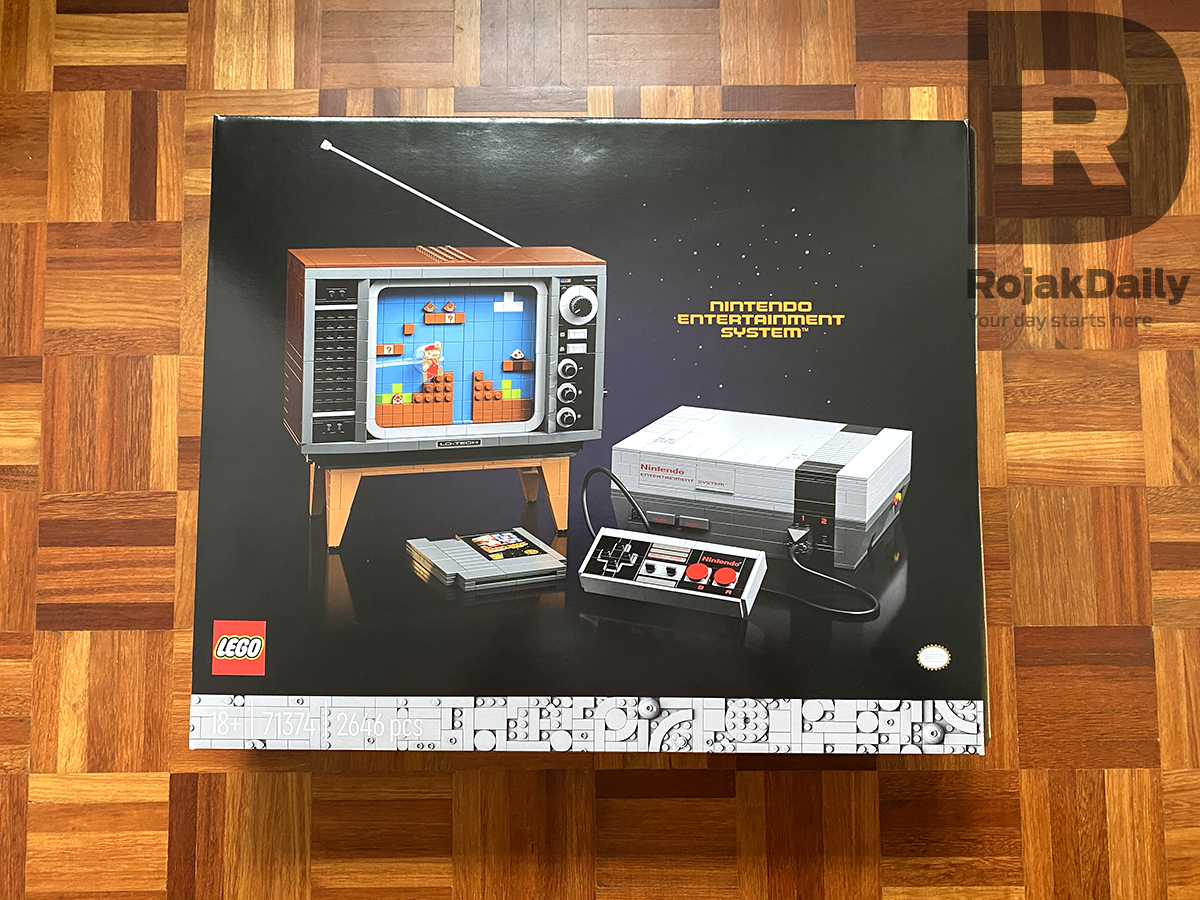
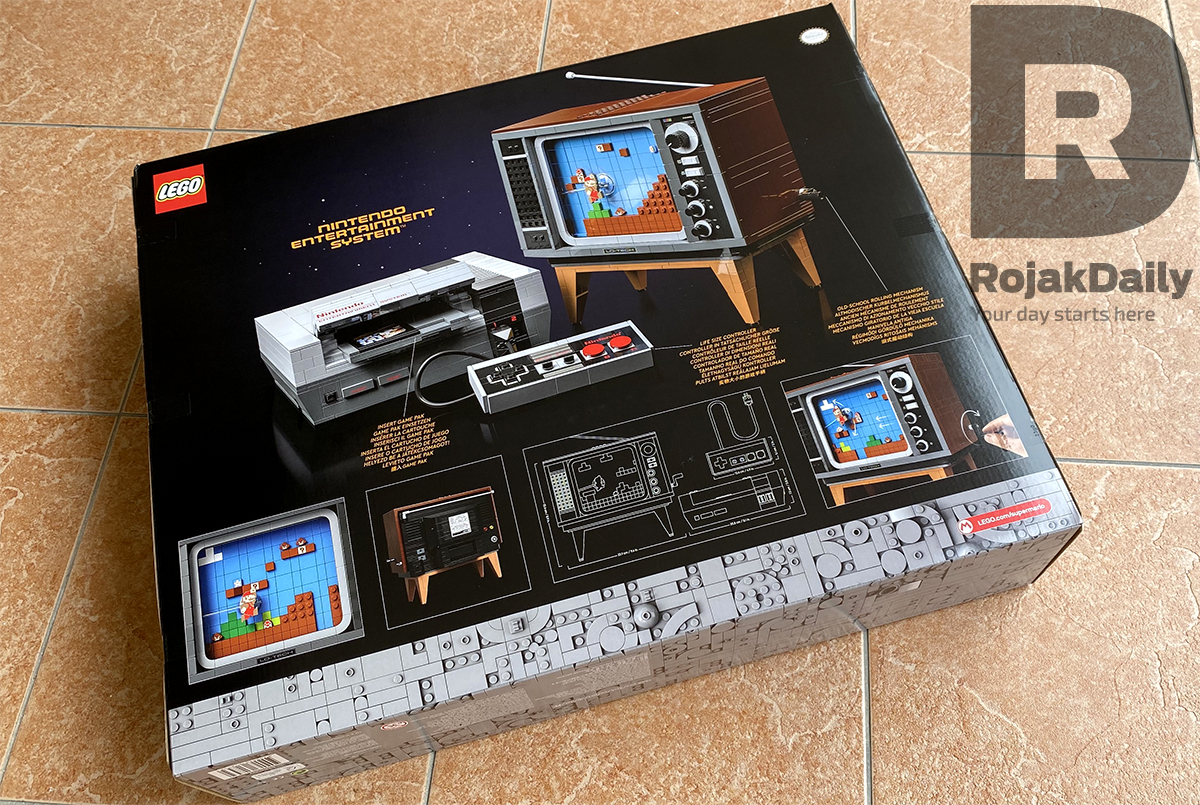
The NES playset is made up of 2,646 pieces, and it's one of the biggest LEGO playsets they have in the Nintendo collab line.
The new NES Building Kit will include a controller with a connecting cable and plug, as well as an opening slot for the Game Pak with a locking feature, just like the real deal.
Not only that, it also comes with a buildable retro TV set so that your NES set doesn't have to sit all alone on the shelf.
Now that we've covered the basics on what you need to know about the LEGO NES set, do join us as we build the entire thing from scratch.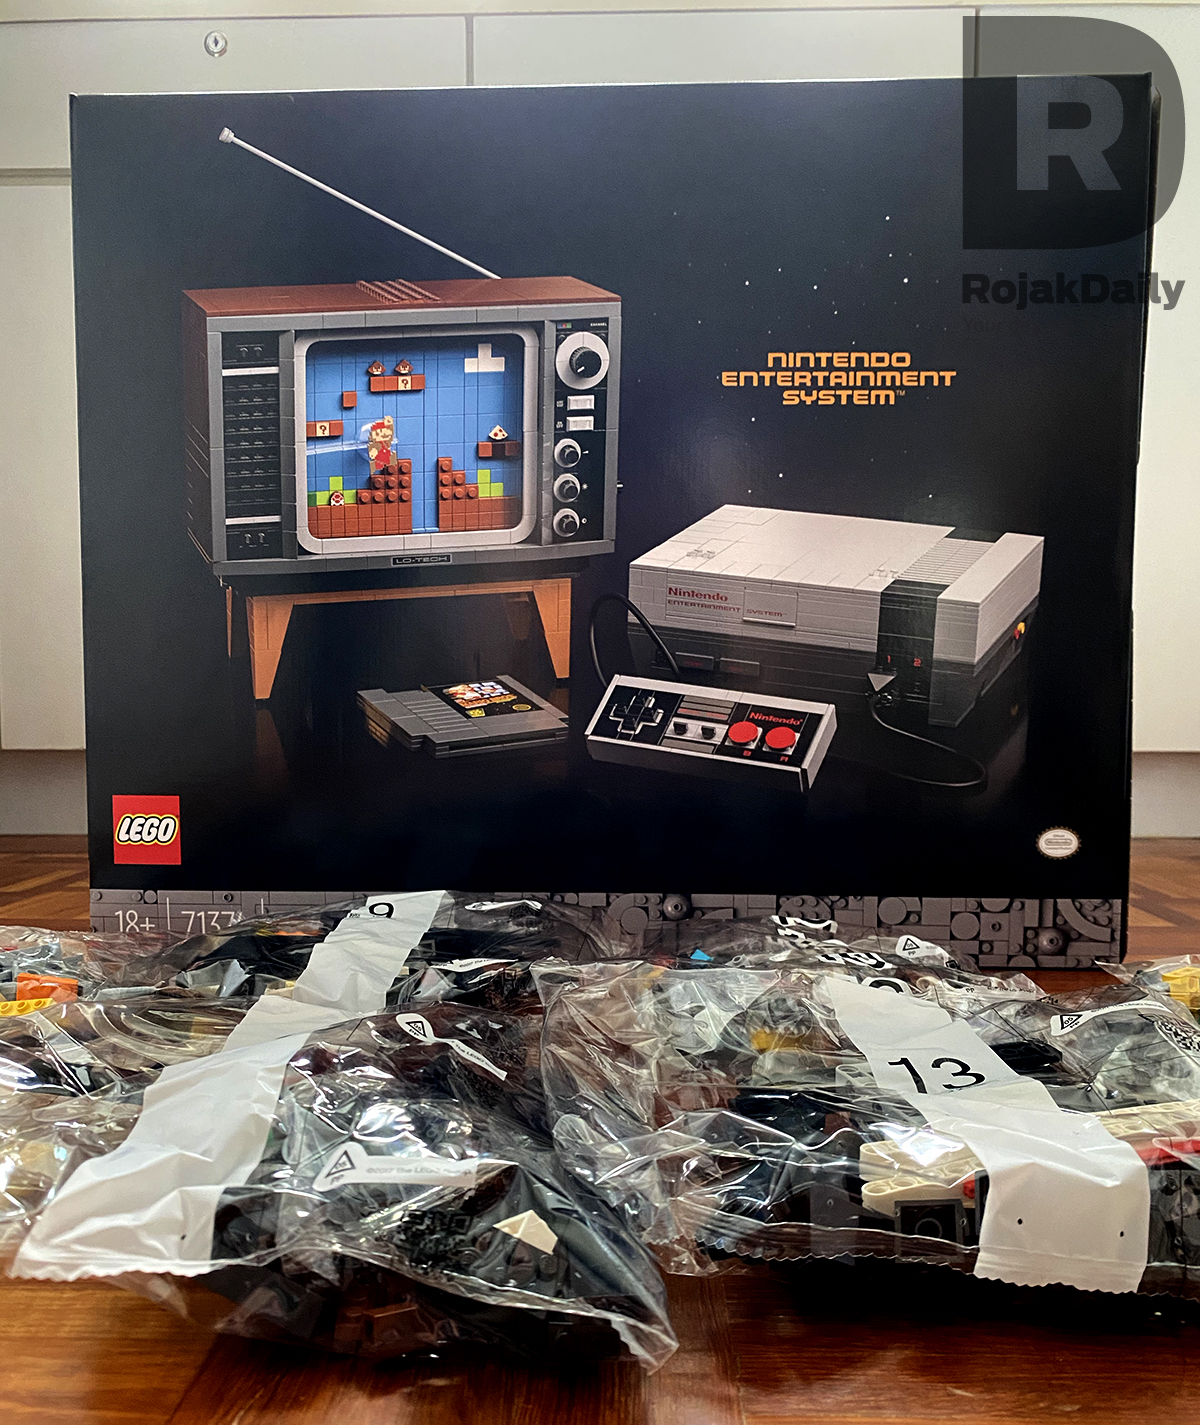
Despite the box size, there's nothing much inside the box except for packets and packets of LEGO you need to build.
If you're hoping for a huge 'Congratulations for getting this LEGO set' certificate or a Super Mario poster, sorry; no cigar.


There are a total of 21 packets of LEGO bricks in the box.
The packets are divided into two: packets one to eight for the NES system itself, and packets nine to 21 for the TV set.
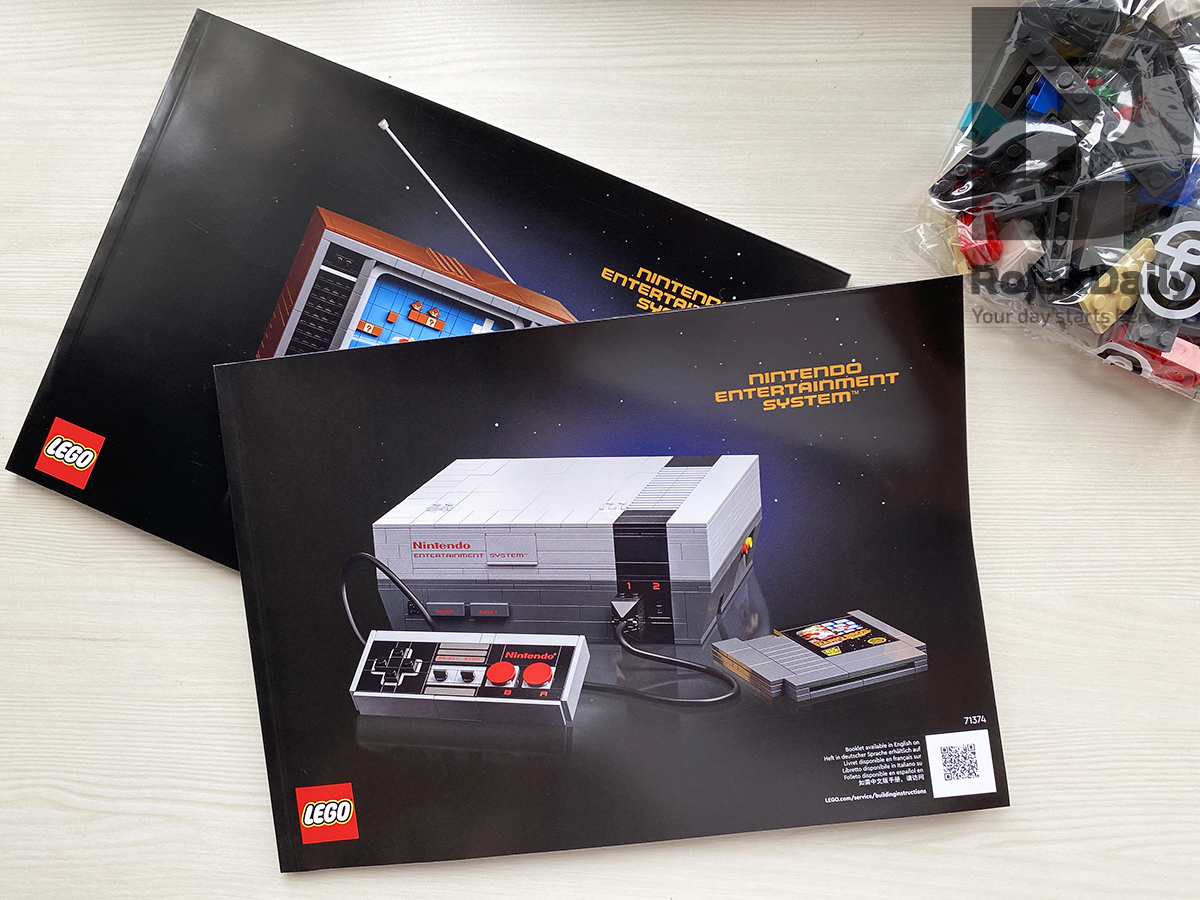
There are also two coffee table-sized instruction booklets, both about 100-plus pages.
So yeah, one look at the instruction booklets and you'll know how much time you'll be spending on the LEGO NES set.
To fully build the NES set, you'll need to assemble eight packets.
The assembly for the the NES set was pretty simple for us, and if you follow the instruction booklet to a T, you wouldn't have many problems building the set.
The instructions in the booklets were easy to follow as well, although we got one minor complaint: sometimes, it's a little bit hard to tell where new pieces are supposed to go due to the colour of the bricks, so LEGO, maybe help us out a little next time?
The building of the base of the NES set was straightforward: the pieces were big enough for you to distinguish one between another.
It is when you're done with the base and you go into the inner workings of the set is when things get a little more complicated.

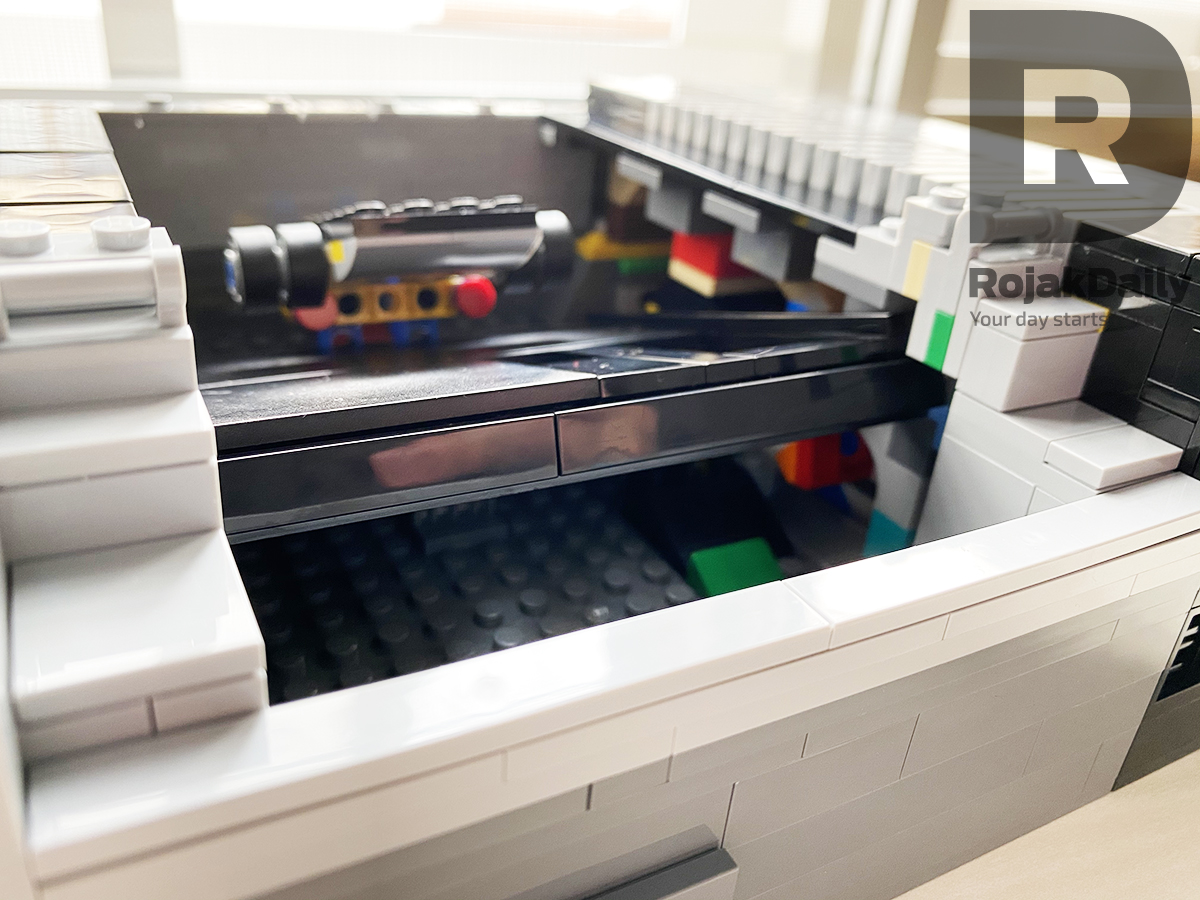
The set boasts a spring-loaded mechanism inside the system (for you to slide in the cartridge), and the smaller pieces you need to build the mechanism and its surrounding areas require a little bit of patience and very delicate fingers.
As some of the pieces were really small and the spots you need to place them in were even smaller, there were a few times where we dropped the tiny piece into the base of the set, and that required some disassembling and angry shaking to get it out.
(We almost rage quit like how we did after dying at the Airship stage of 'Super Mario Bros 3' for the 19th time)
So, considered yourself warned.
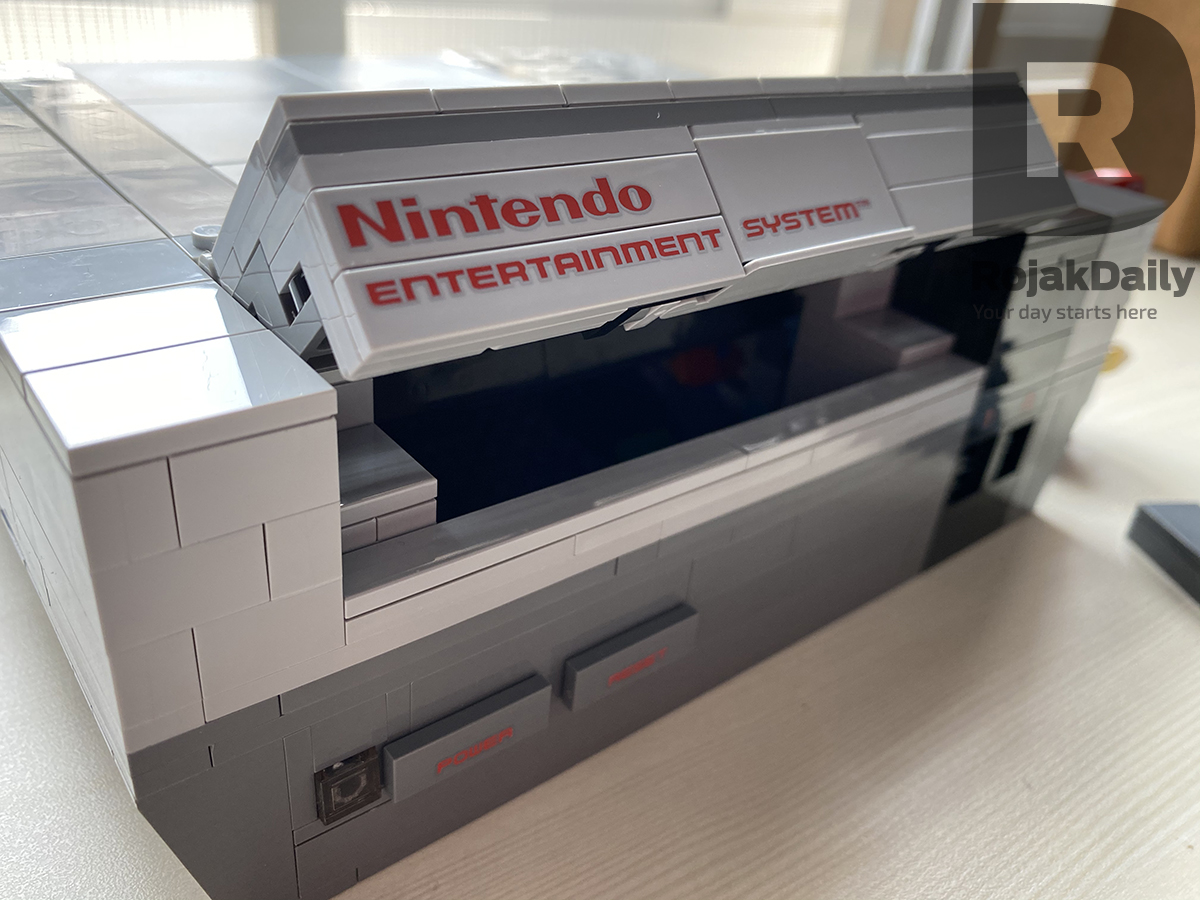
Once you get past that, building the outer shell was as easy as 1 Up, 2 Up and 3 Up. The outer shell uses medium to large-sized smooth pieces, and it's as easy as just snapping them into place.
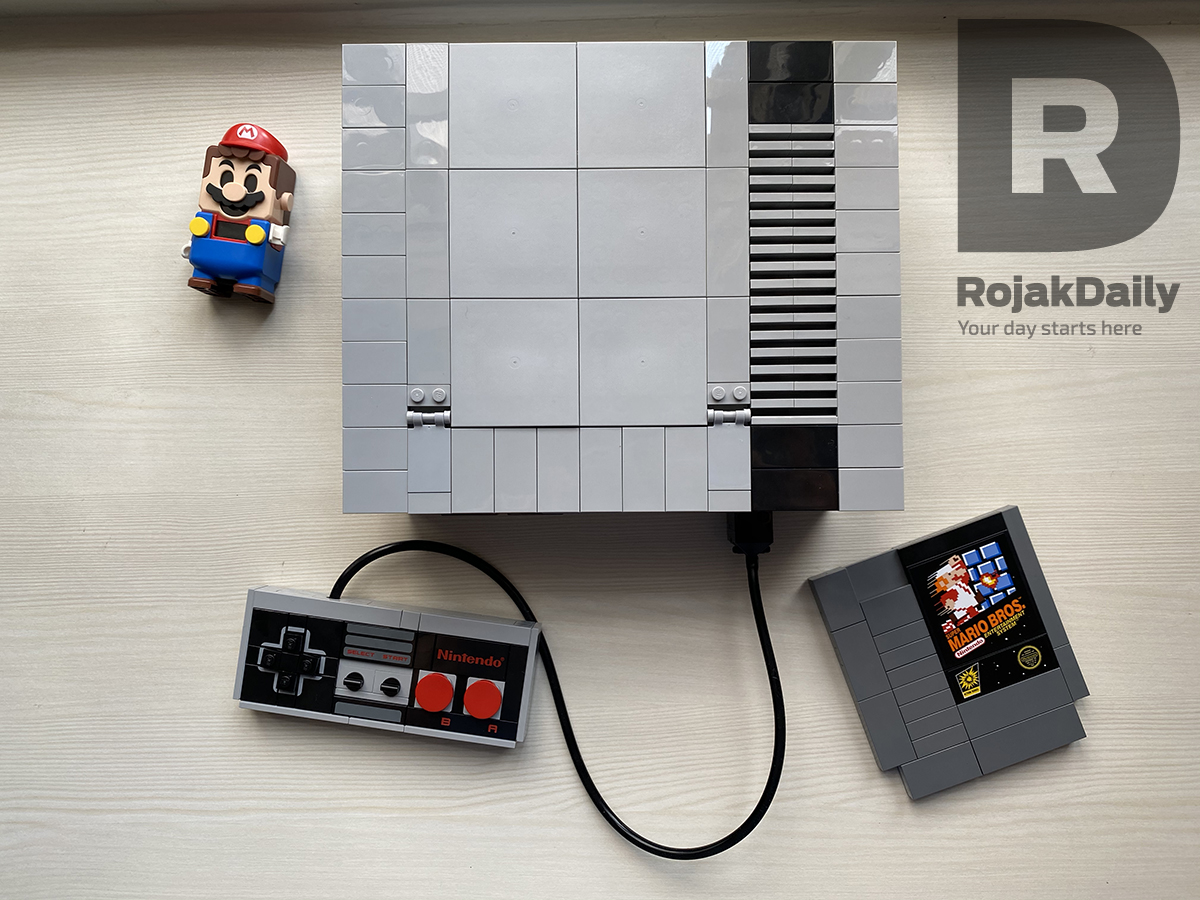
Here's what the finished product looks like:
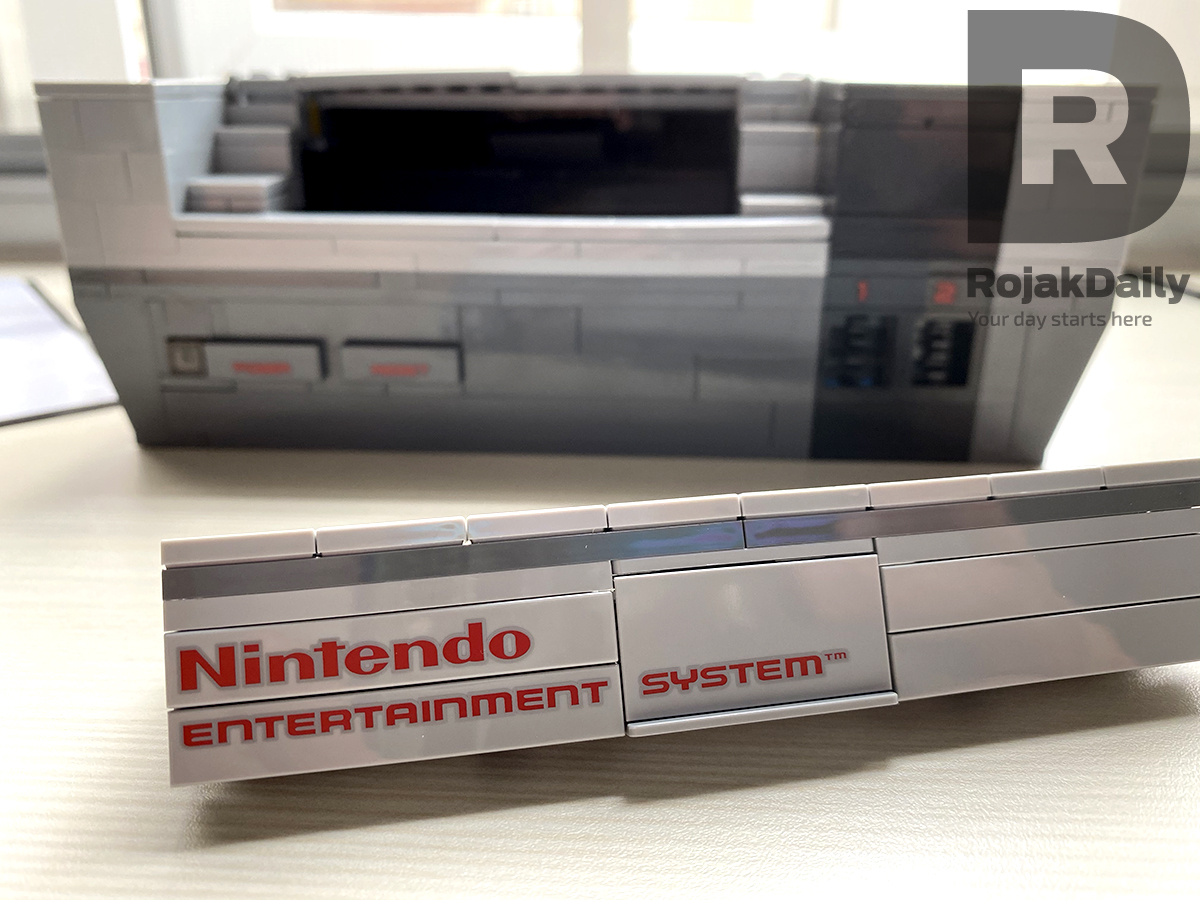
We absolutely love the attention to detail that goes into the LEGO set.
From the 'Nintendo Entertainment System' plaque at the front, the 'Power' and 'Reset' buttons right below it and the controller input slots at the bottom, the LEGO set, once built, looks exactly like the real thing.
There is also an 'Audio' and 'Video' jack at the back of the unit - just like the real NES.

The entire set is not really that heavy, and when you hold it in your hand, you can't help but marvel at it, because it's solidly built and it just looks too darn good.
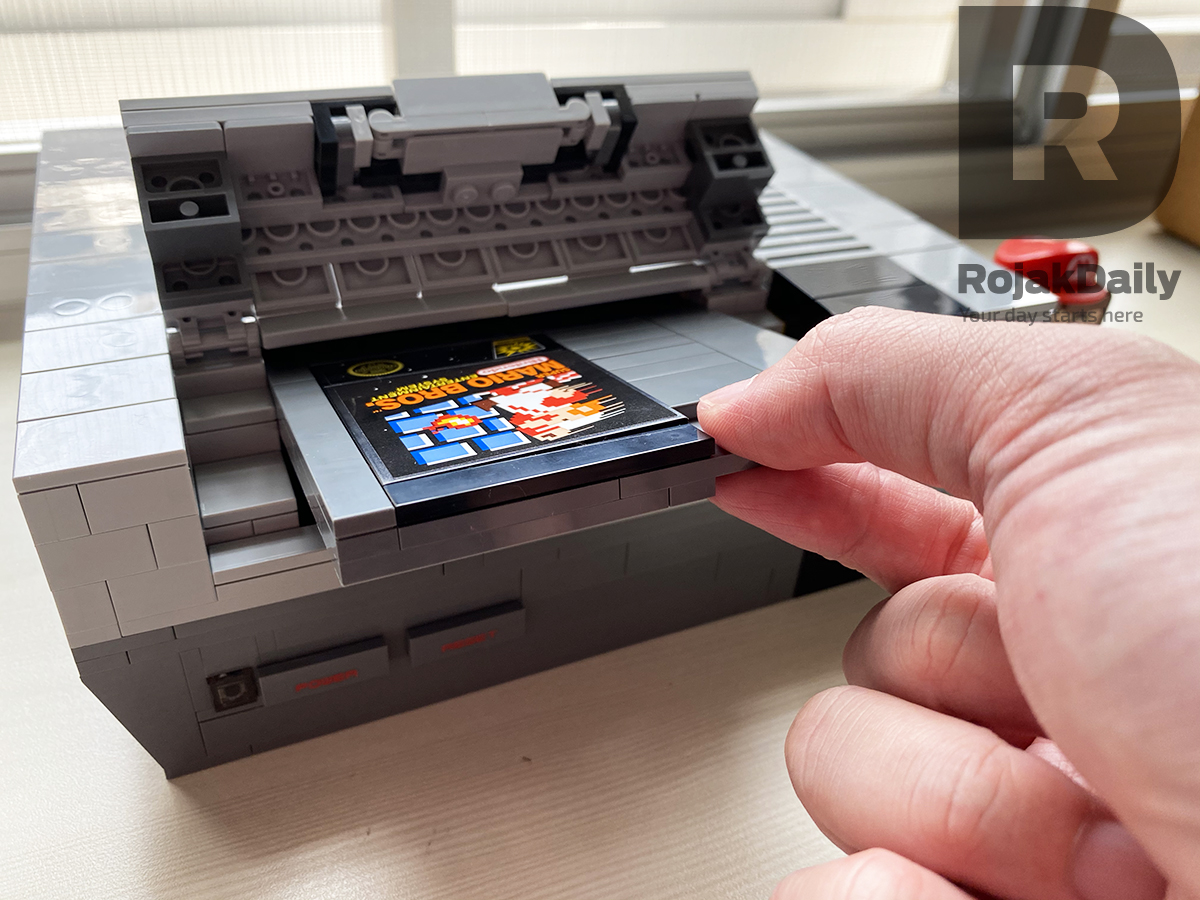
Next up is the video game cartridge, also known as the Game Pak, we all are familiar with.
This is perhaps the easiest thing to build, as it requires only one bag (Bag 6) and the pieces are medium to big size. There's basically nothing much to assemble, as all you need to do is just to snap the big pieces into place.
Once that's done, you just need to stick the 'Super Mario Bros' sticker (which we absolutely love 'cos it resembles the original 'Super Mario Bros' graphics) on the interface and voila, you have your Game Pak.
The coolest part is that you can flip the front part of the NES unit open, and slot the cartridge in like you would the real thing.
Once it's fully slotted in, you can close the flap and proceed to imagine yourself playing 'Super Mario Bros' like back when you're a kid.

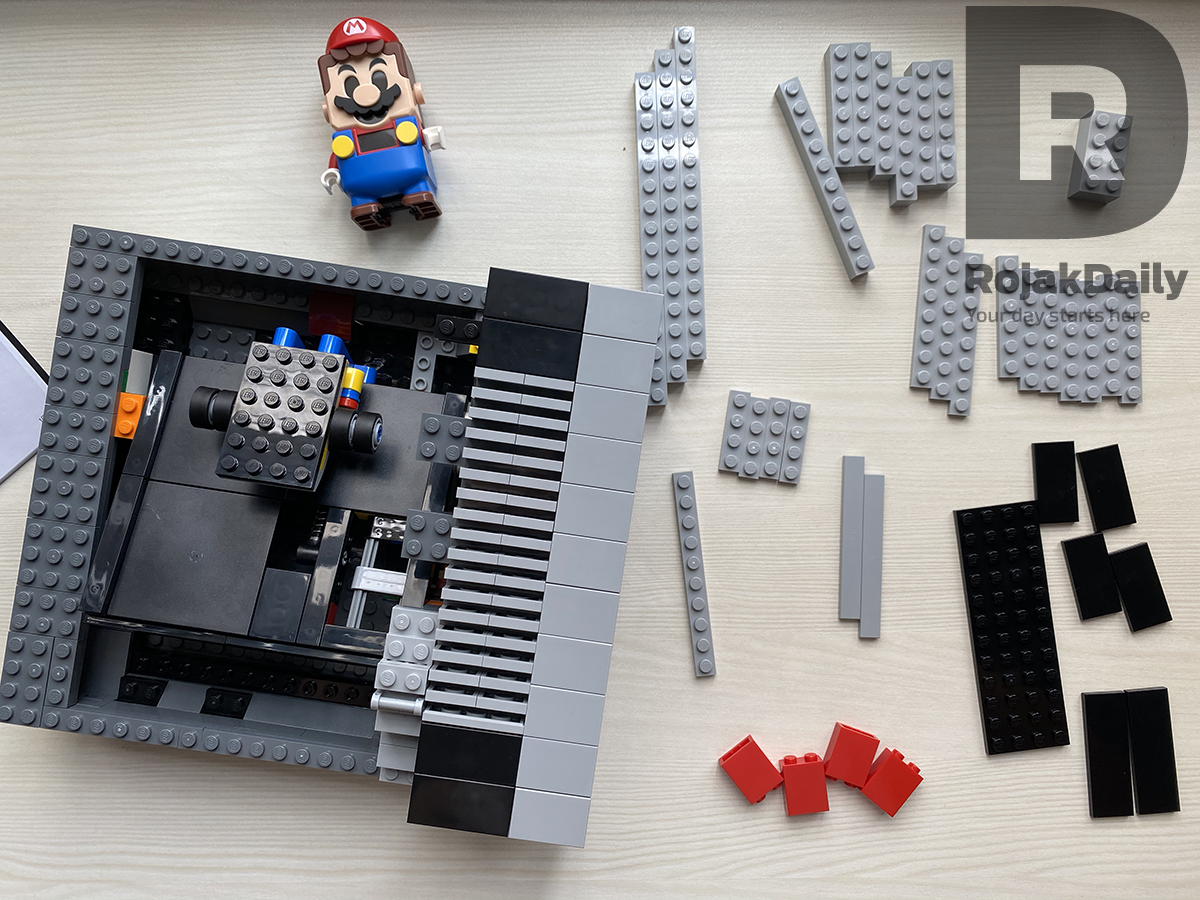
Now we've come to the last piece of the puzzle: building the iconic NES controller.
The controller has more pieces than the NES cartridge, and it's not as easy to assemble as the cartridge because it has tonnes of small little pieces, but it is still pretty straight forward.
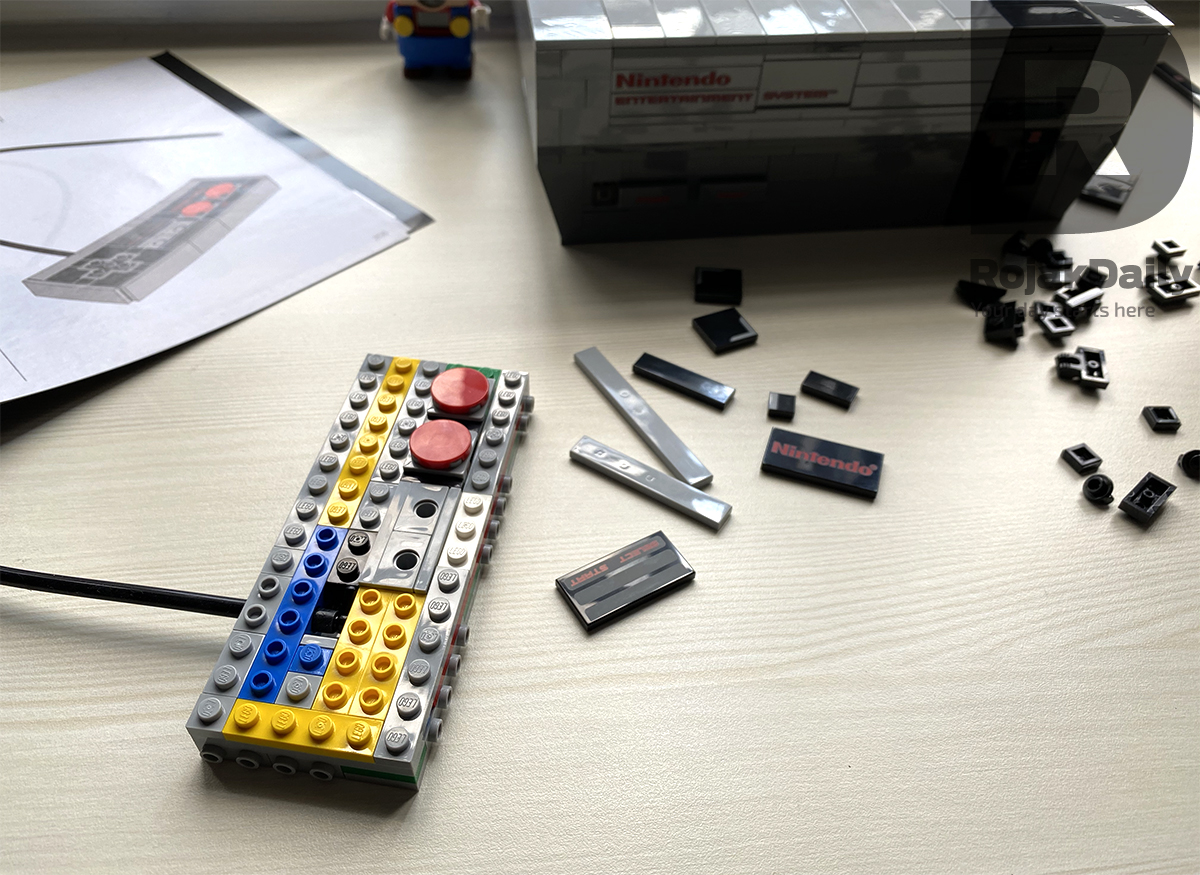
But once it's fully assembled, you can see that the cotroller is totally the doppleganger of the real thing: down to the D-pad, the 'Select' and 'Start' button as well as the recognisable 'A' and 'B' red buttons.
To be honest, you could even fool people into thinking that that's the real NES controller.
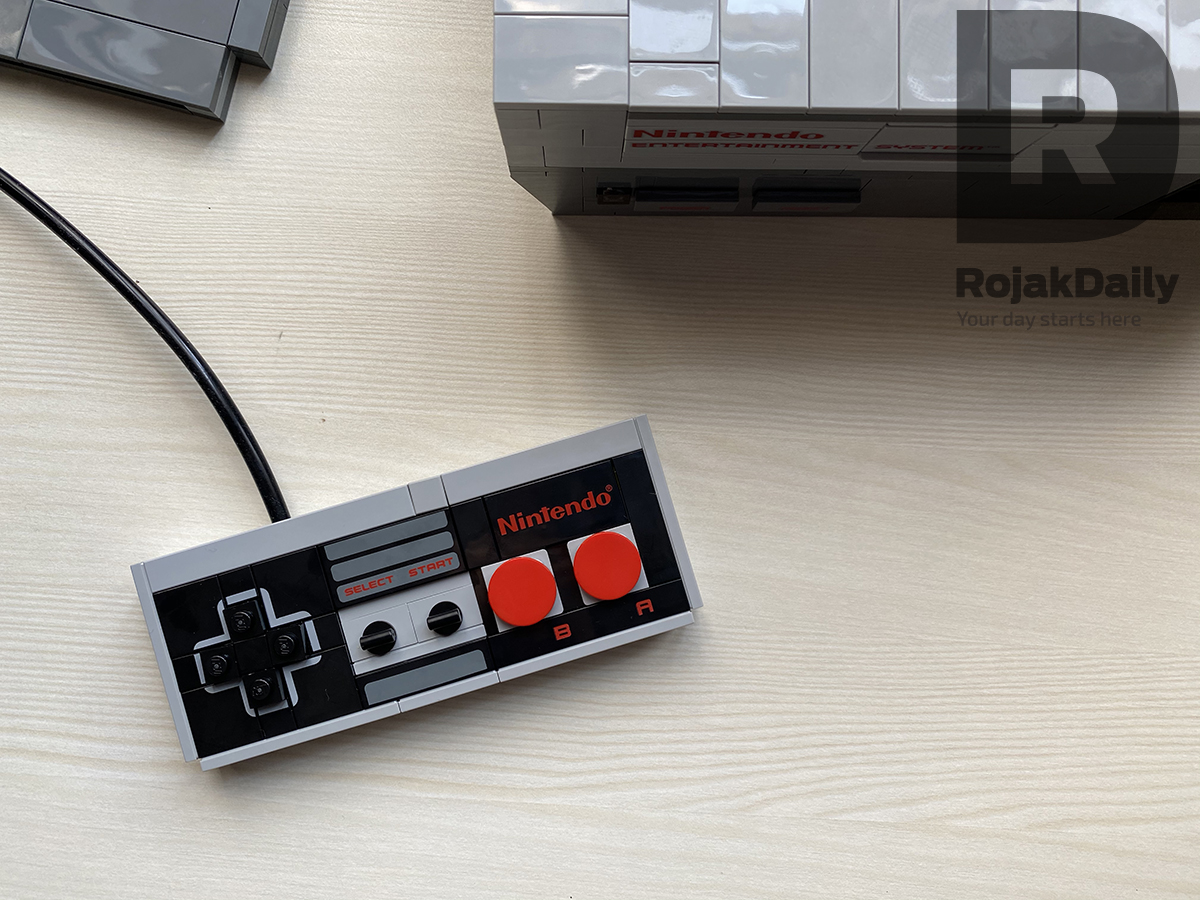
You can then connect the controller to the NES unit with a built in rubber cable and hand-built connector. Brilliant!
Here's what the entire NES set looks like once you're done with the whole thing.
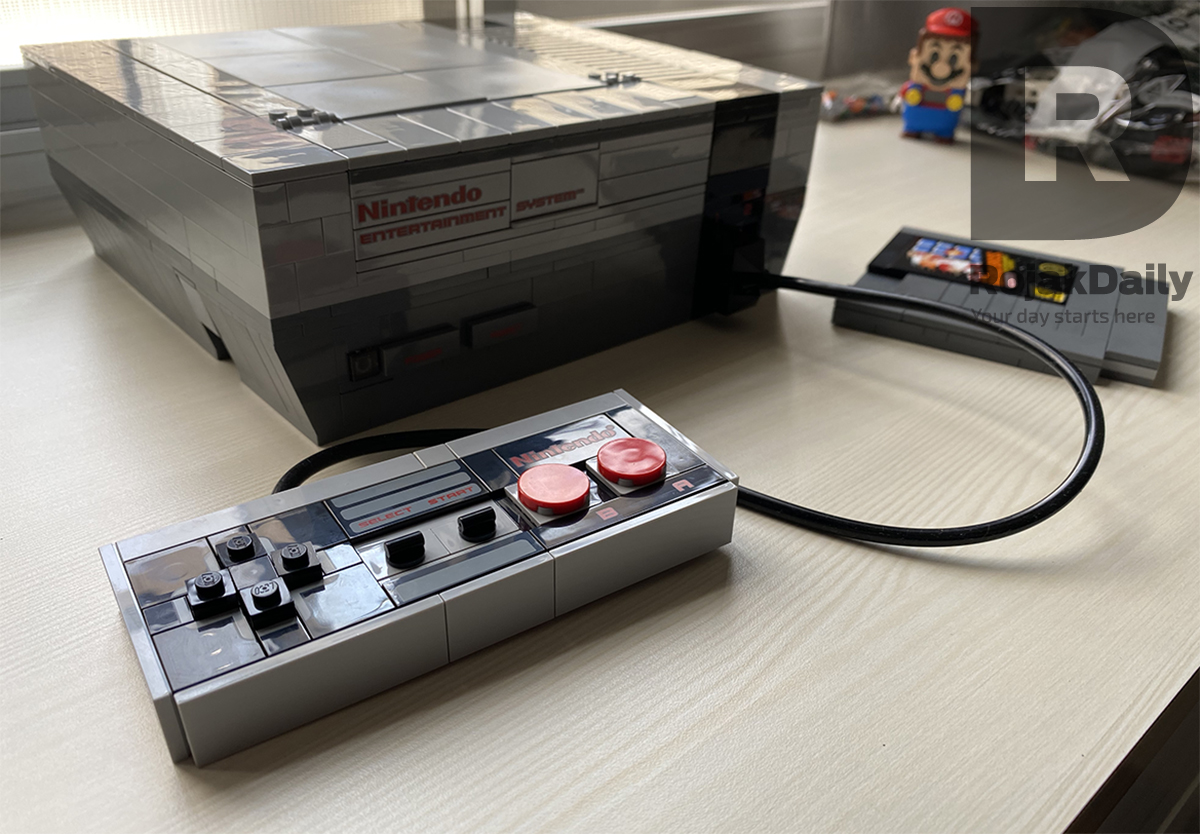
Gorgeous, isn't it?
In total, building the entire NES set set took us four hours, give or take.
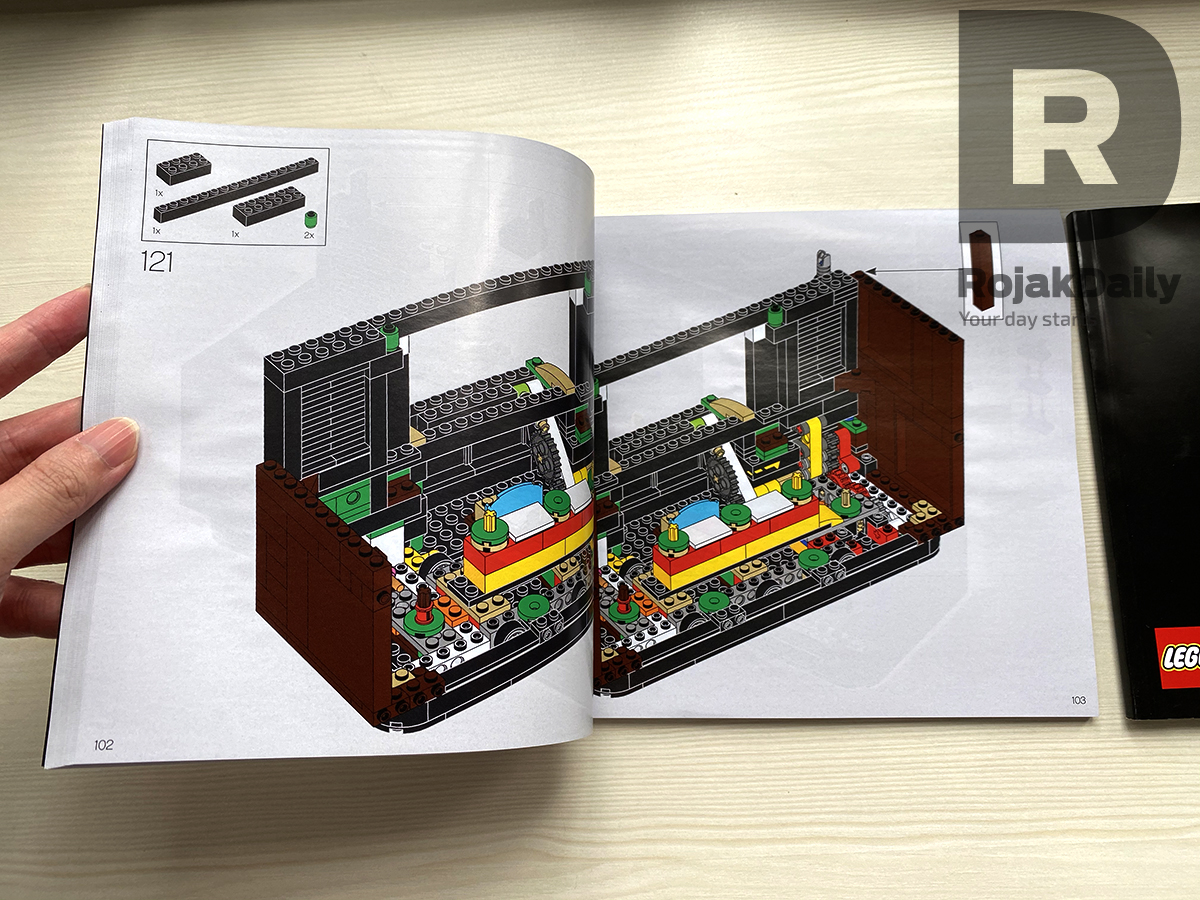
The reason why we say the TV set is the real 'monster' is because 1) it has more packets of various sizes compared to the NES unit and 2) it has a lot of small moving parts.
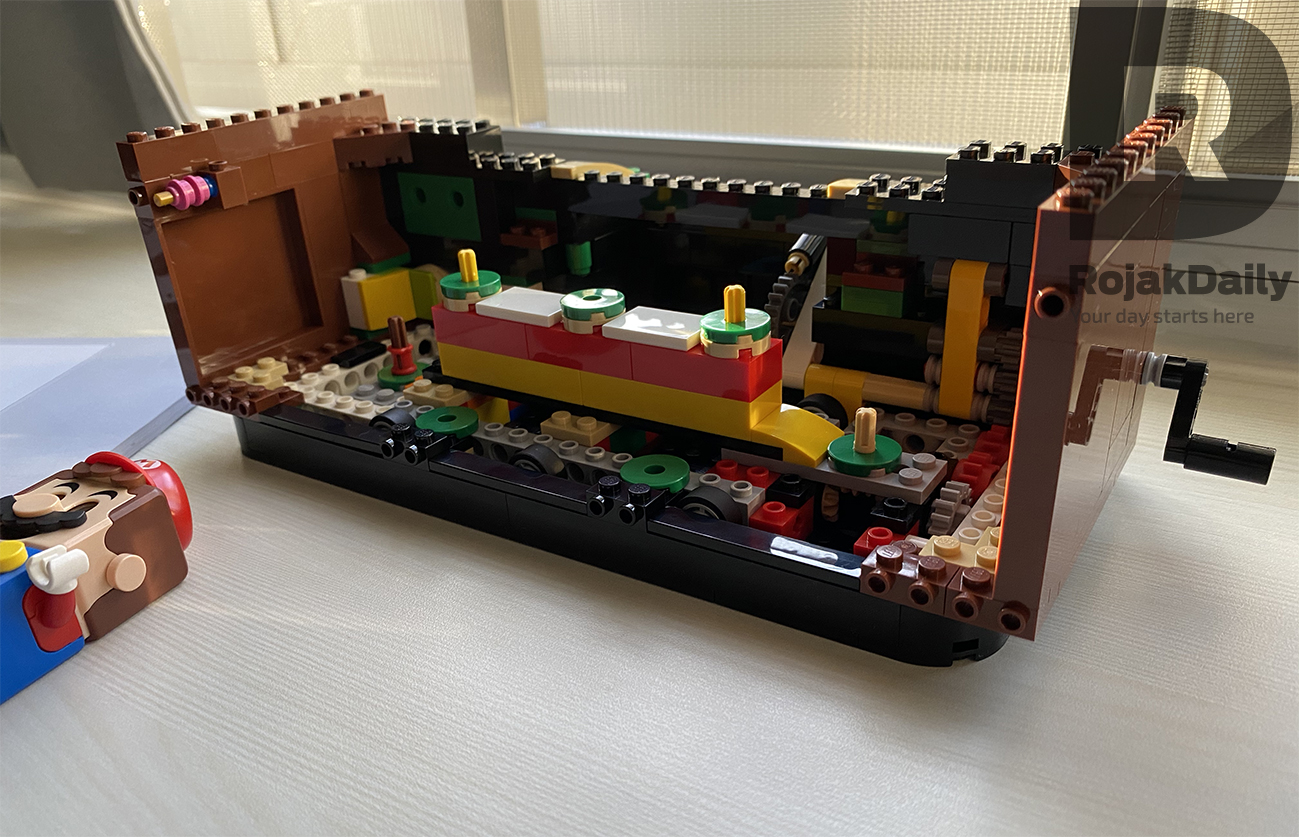
The first few packets involves building the base of the TV set, as well as the moving mechanisims, so you'll be assembling a lot of turn gears and little wheels.
The process is not very hard -- again, follow the instruction booklet and you'll do fine -- but the difficulty level is definitely higher compared to the NES unit due to the amount of small parts you'll find in the first few packets.

But don't worry; your nightmare will end after just four packets, as the subsequent packets are super easy because now, you'll start building the shell of the TV set instead.
So, you can expect to find lots of big, easy-to-distinguish pieces.
You'll even get to attach the antenna to your TV set too.
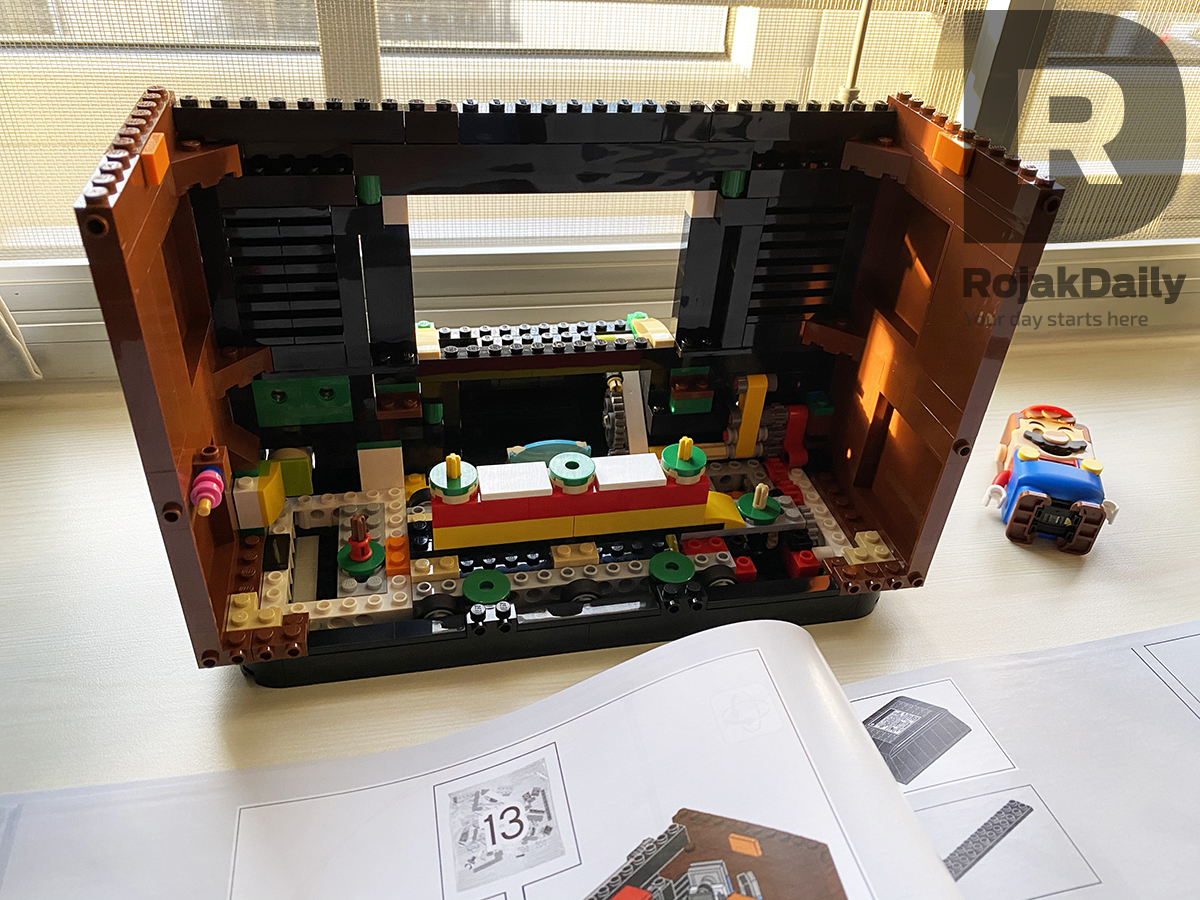
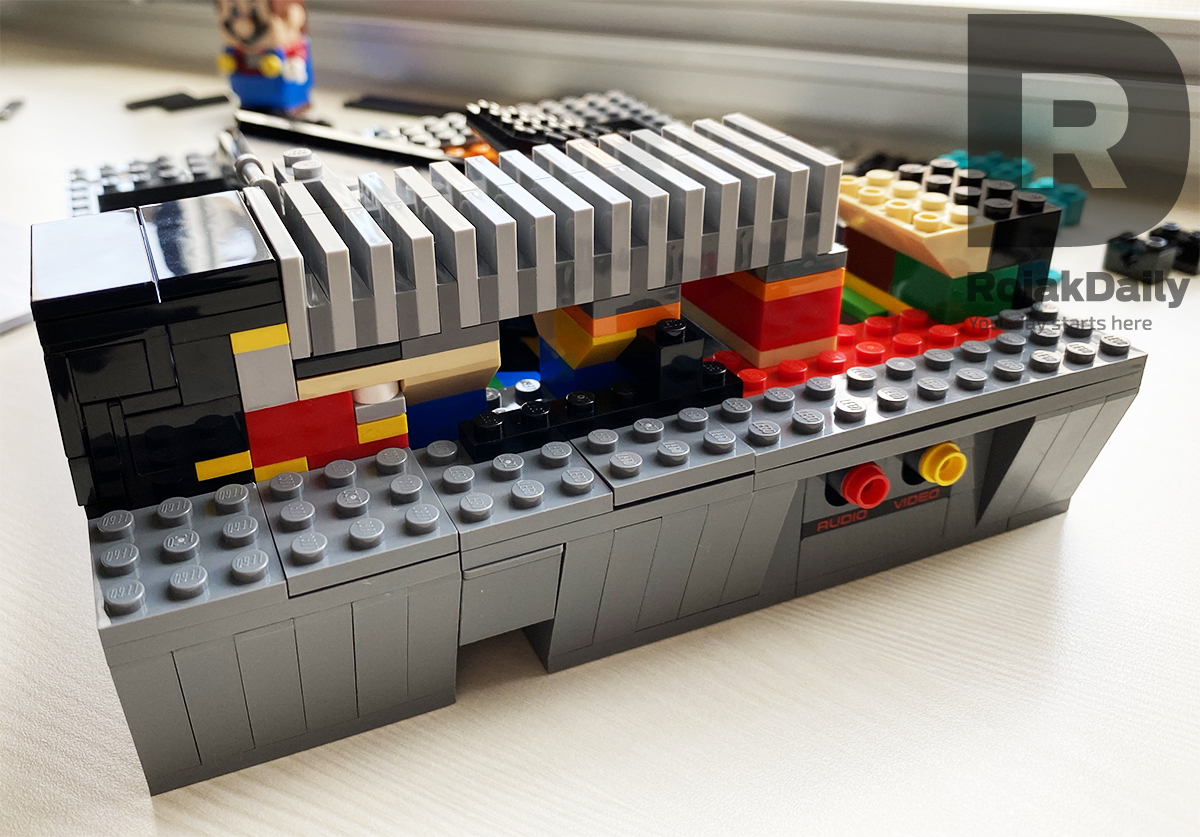
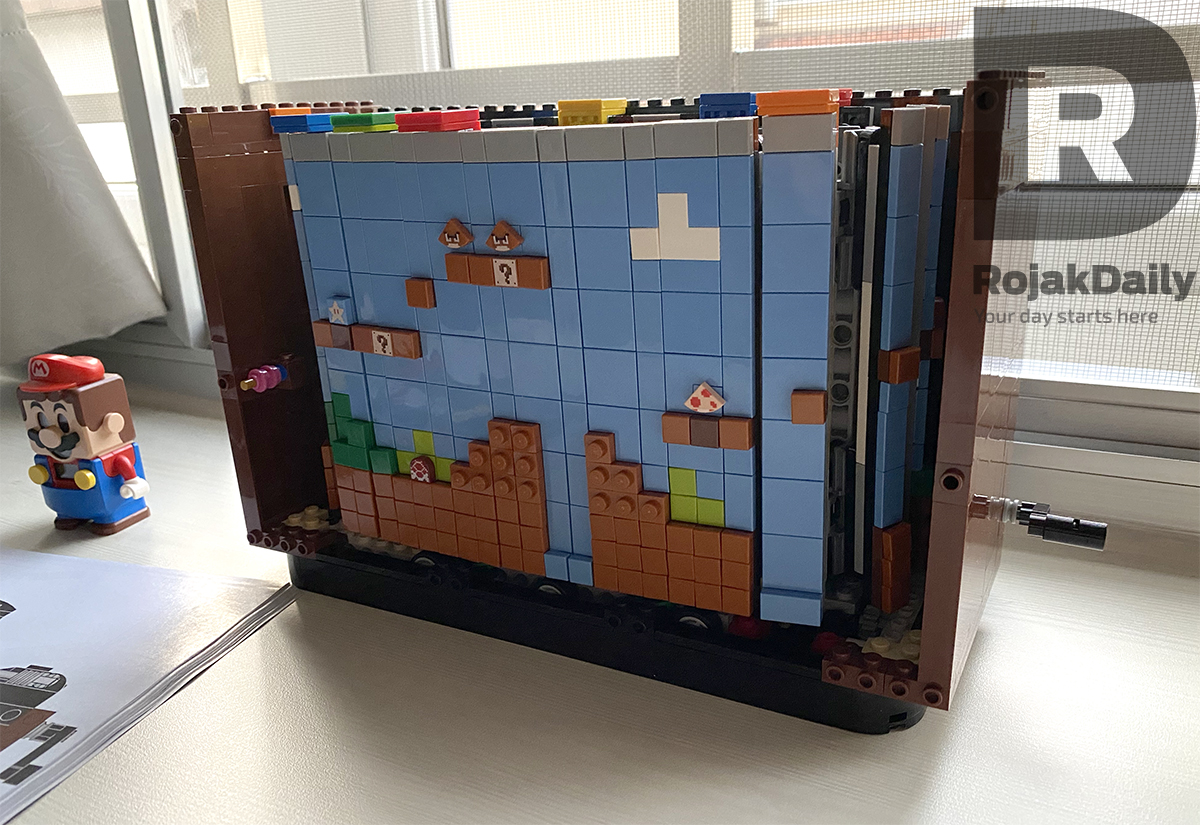
Now that you've got the base of your TV ready, now comes the fun part: building the scrolling 'screen' with the 2D Mario!
The pieces for the TV 'screen' is pretty medium to big-sized, so it's not really that hard to build.
However, this is also where things get a little 'boring', as you need a lot of patience because you'll be doing the exact same thing over and over and over again.
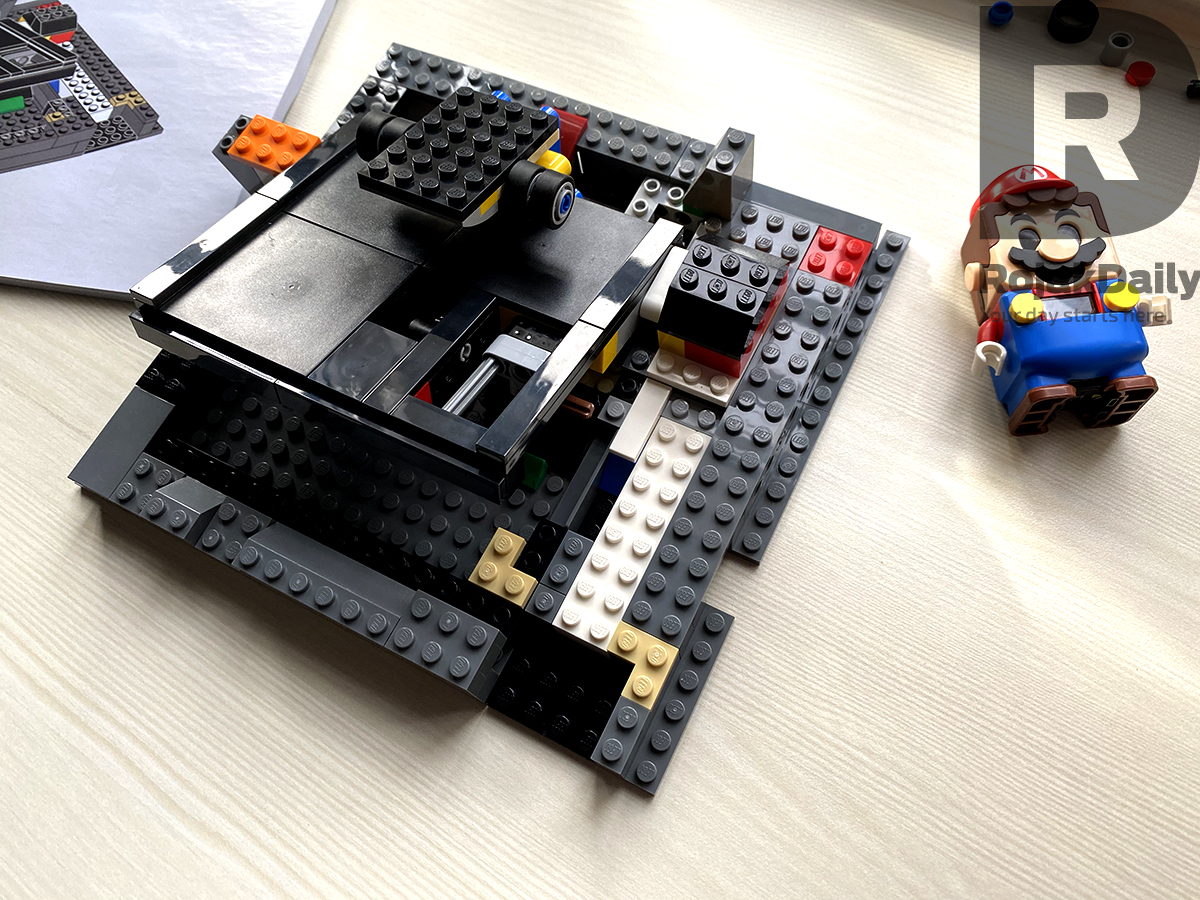
You'll start by building a sort of 'roller' that acts as the base for the scrolling screen, and it's harder than it looks, in the sense that you'll get a little bit bored because it will seem like you're building the exact same thing and you're not going anywhere.
Once that you've fully assembled the moving screen, comes the most painstaking and mundane part: snapping in the small pieces that make up the 'graphics' of one of the 'Super Mario Bros' stages in the video game.
And we're talking about snapping in those 0.5cm tiles one by one and let us warn you, the whole process will last you 45 minutes or so.
If you're someone who has little to no patience, this section will definitely test it.
We would be lying if we said we didn't take a short nap halfway into building the screen.
But of course, patience is a virtue, and once you're done with the entire screen, you'll feel a sense of accomplishment because look at how pretty it is:
Bonus: how cute is this little Goomba tile?
Now that you've got your moving screen, it's time to put your screen into the TV set.
You do that by folding and wrapping the screen like a roti canai (we're not kidding) around a white, car-like contraption you built earlier, which serves as the mechanism that allows you to turn the screen when you move the turn wheel.
Once you've placed your screen into the TV box, now you have to build the rest of the TV set, starting with the front frame of the TV.
Thankfully, this section is really simple and straight forward, because we have a feeling LEGO doesn't want you to fall asleep again.
We were really impressed with the level of details displayed on the front frame of the TV.
It has knobs, volume up and down buttons and other switches you'll typically find in a retro TV.
But the one detail that impressed us the most is that the bigger 'Channel Select' knob at the top right hand corner is fully functional - as in, you can turn it as if you're selecting a channel and when you do that, it makes a very satisfying clicking sound like it would when you turn the knob on a real retro TV.
The clicking sound is achieved thanks to this little green plastic tube you attach to the turn gear that connects to the big knob in front part of the TV.
So, everytime you turn the big knob on the front of the TV, the turn gear will hit the little plastic tube, and that's where the 'click' sound comes from.
Very clever indeed. We love it!
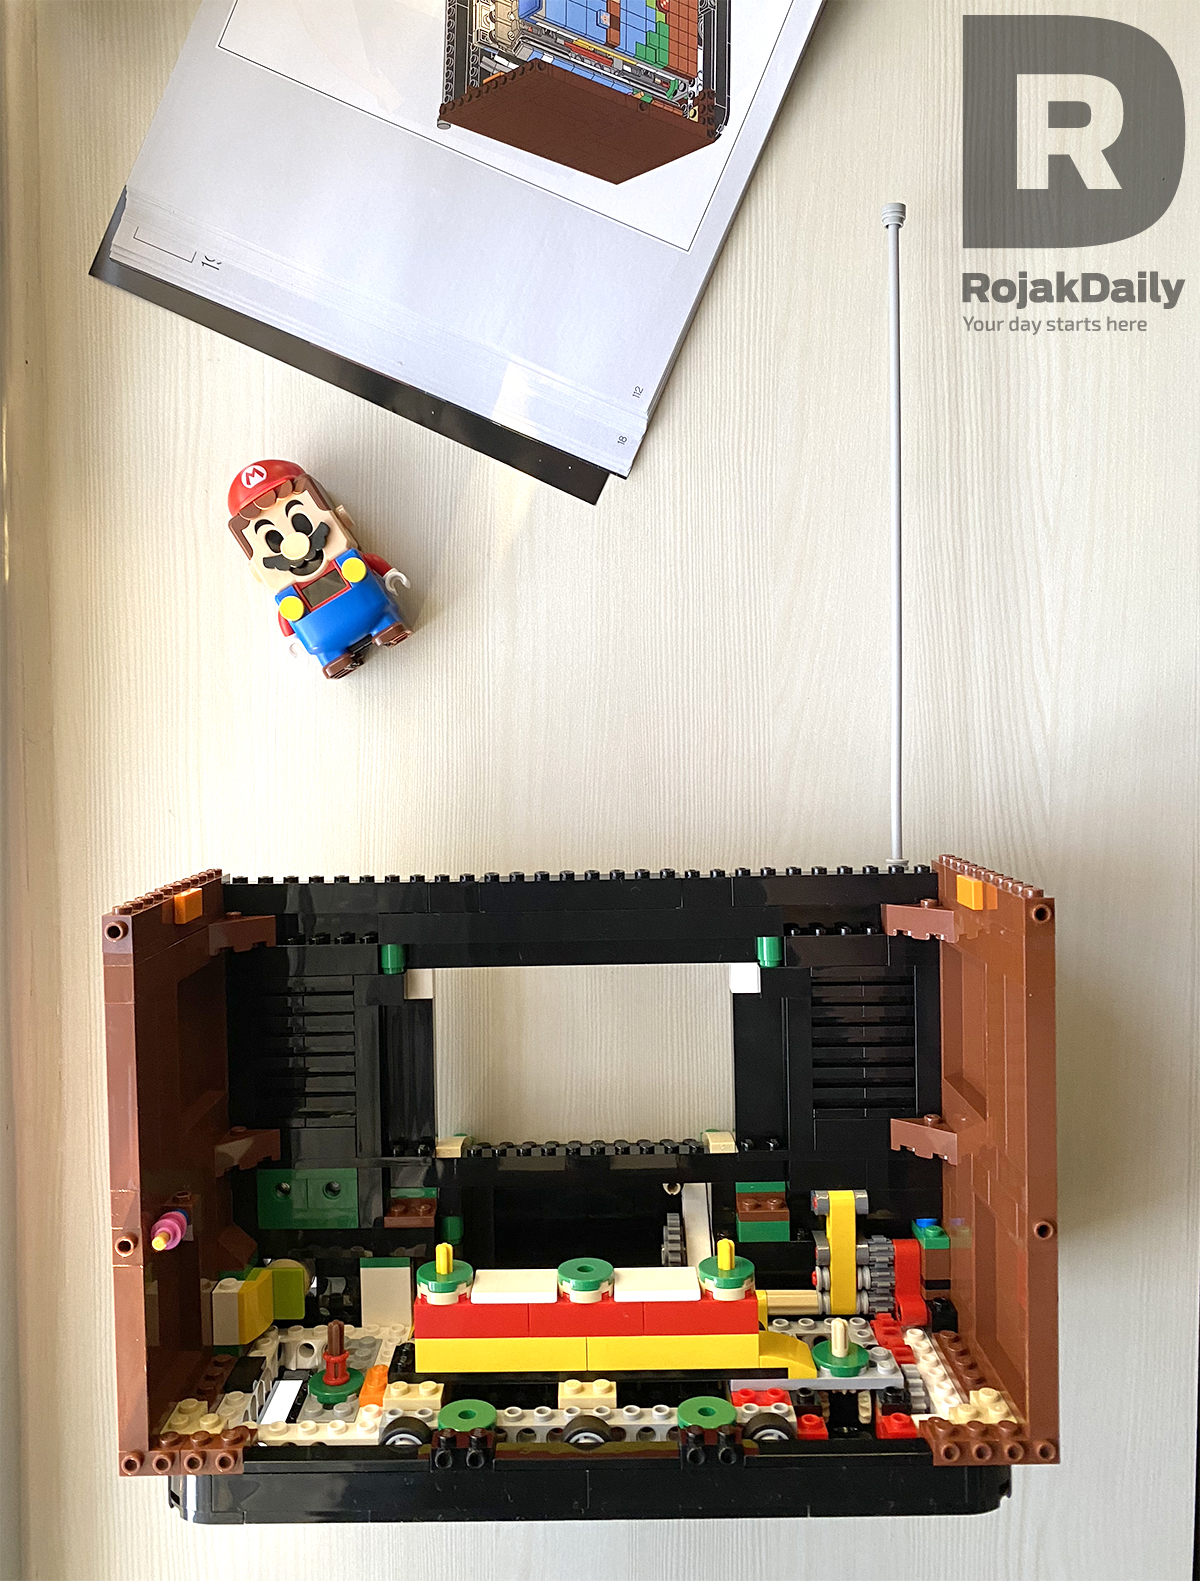
Before you attach the frame to the TV box, you will first need to install the cute 8-bit Mario onto the screen first.
Yes, this cute little Mario:
To do that, you need to attach the Mario onto a transparent stick, and mount it to the side of the TV box.
The stick acts as a holder for the Mario when you turn the turn handle at the side of the TV box, so it will make it seem like Mario is running and jumping over hurdles like he would in the original video game.
Once you're done with that, all you need to put on the finishing touches: that means installing the TV box stand, snapping the TV frame into place and voila, your retro TV set is now complete!

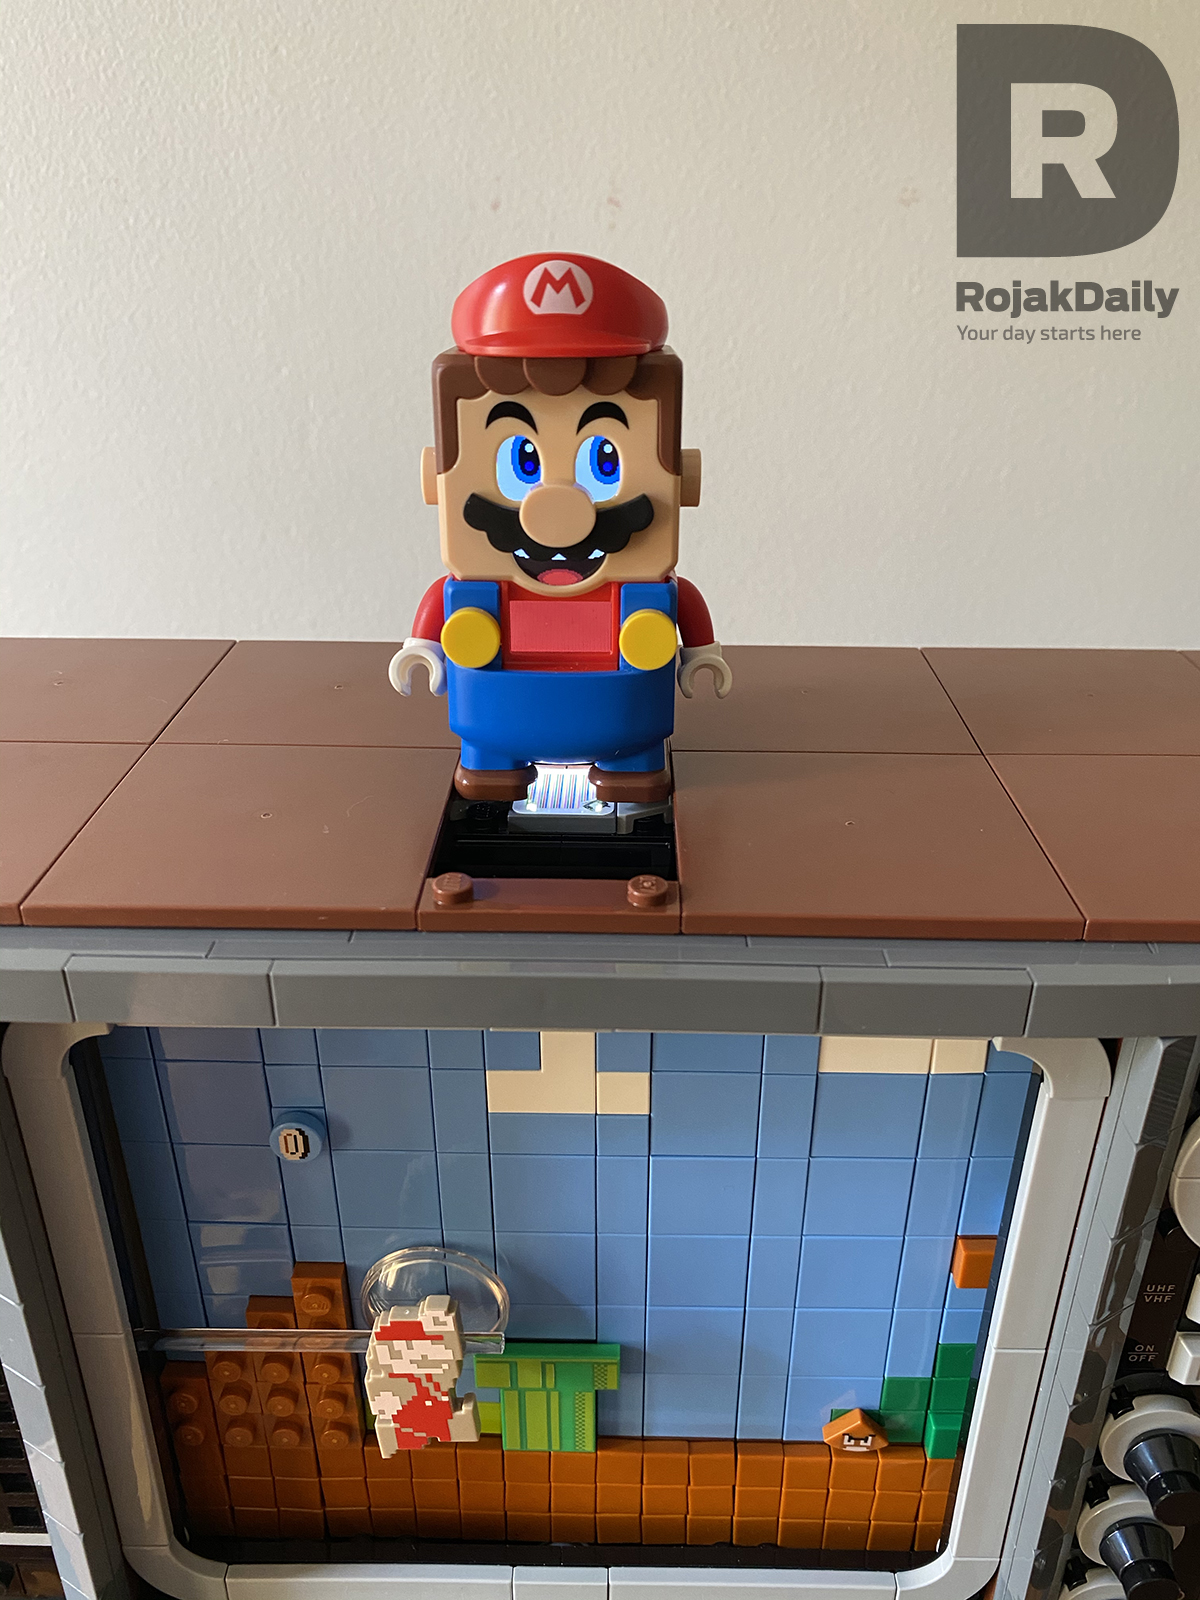
And here's a cool little Easter Egg: if you own the interactive Mario from the Super Mario Starter Course LEGO playset (you can read more about it here), you can have it give you some background music too.
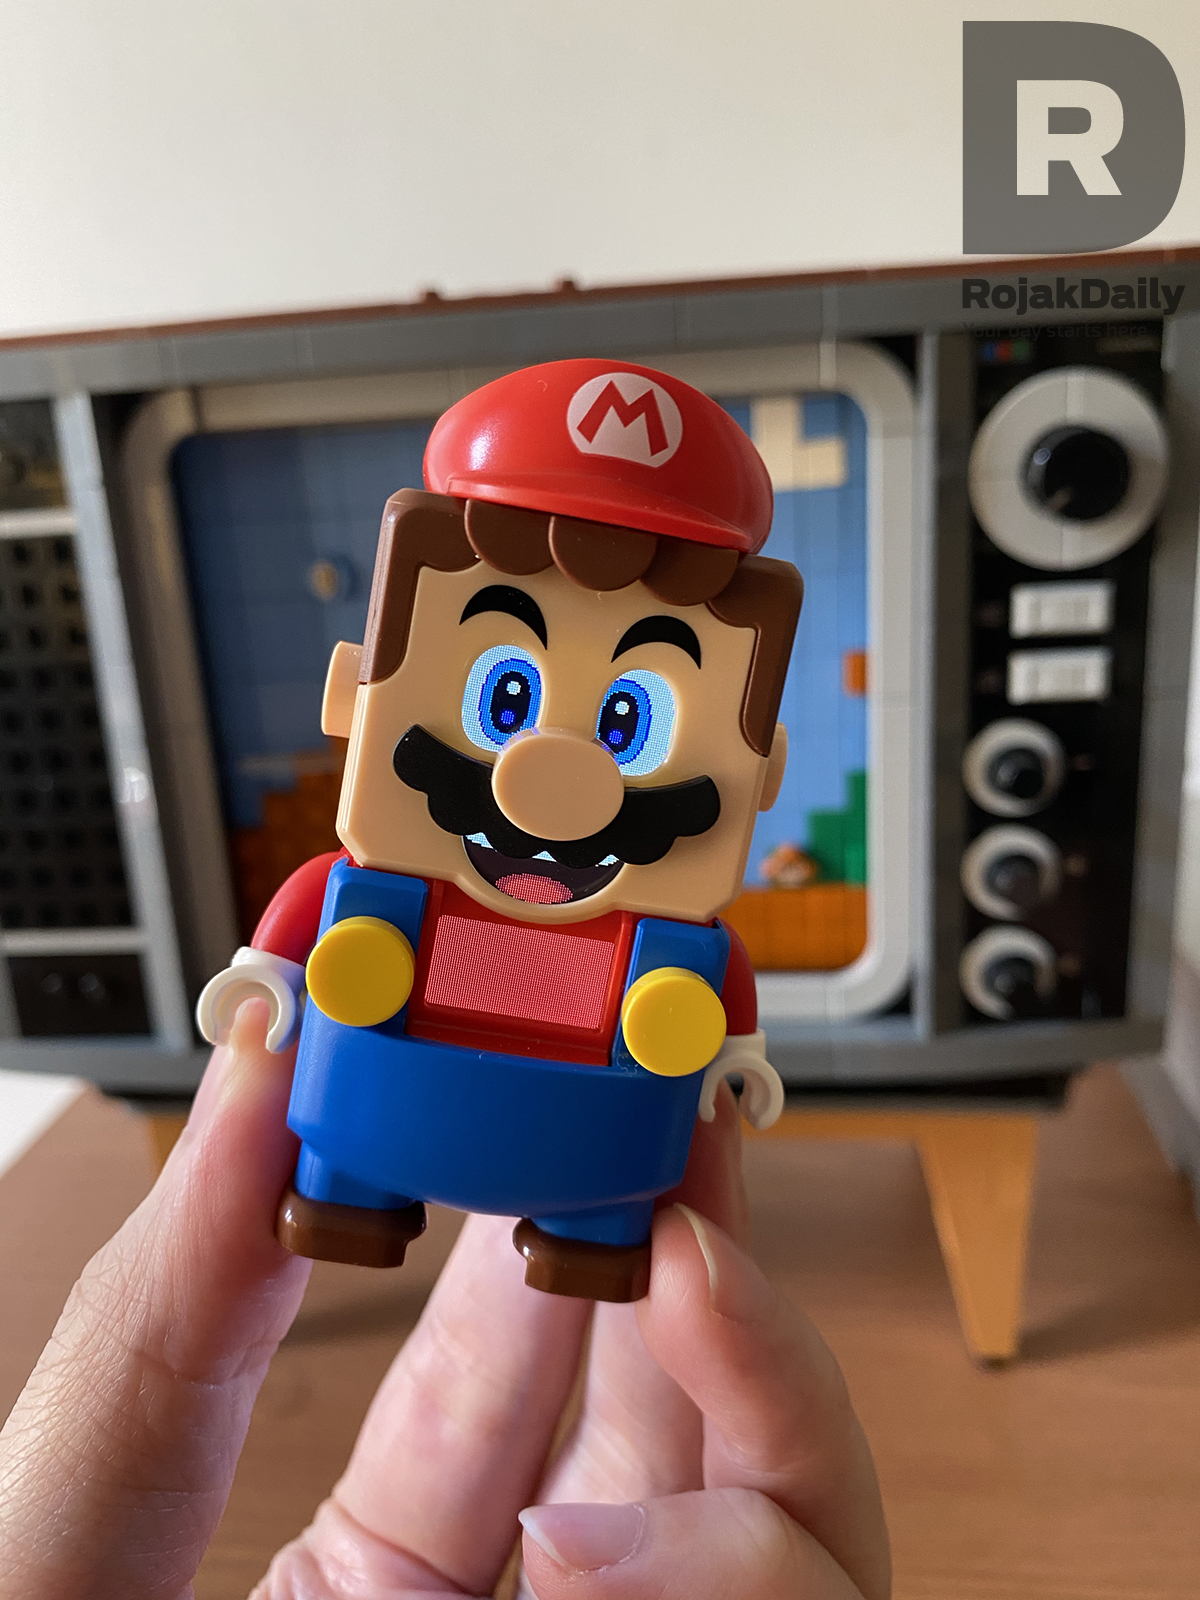
All you have to do is pop out a section on top of the retro TV box to reveal a QR code (yes, the set has a special QR code), place the interactive Mario on top of the code and the Mario will light up and PLAY THE ORIGINAL MARIO THEME SONG!
How incredibly cool is that?
The LEGO NES set is like a gift that keeps on giving, and we can honestly say that it's one of the best LEGO playsets that we've ever had the chance of building.
In total, we spent a good eight hours building the entire set. There were some frustrating bits, there were also some boring bits, but in all, it was a fun experience.
We absolutely love LEGO's attention to details when it comes to the retro TV set, as well as the Nintendo Entertainment System.
When you put both of them together, it definitely will be the centerpiece of your entire LEGO collection.
You can now pick up the LEGO NES set for RM949 at LEGO Certified Stores and LEGOLAND in Malaysia.
BRB, we're going to play with the set somemore because it's super cool.
Nintendo was -- and still is! -- one of the biggest video game companies in the world, thanks to the popularity of its catalogue.
The Japanese company, in collaboration with LEGO, has recently launched several Super Mario interactive playsets, and that further reminded every 80s kids' about the hours they spend in front of their TV trying to defeat Bowser and rescue the princess.
So, imagine our surprise when a huge box of LEGO was dropped off on our doorstep one fine day.
It turns out, it was the LEGO Nintendo Entertainment System (NES) set; something that we personally know very well because we're huge fans of 'Super Mario Bros' back in the day.
The NES playset is made up of 2,646 pieces, and it's one of the biggest LEGO playsets they have in the Nintendo collab line.
The new NES Building Kit will include a controller with a connecting cable and plug, as well as an opening slot for the Game Pak with a locking feature, just like the real deal.
Not only that, it also comes with a buildable retro TV set so that your NES set doesn't have to sit all alone on the shelf.
Now that we've covered the basics on what you need to know about the LEGO NES set, do join us as we build the entire thing from scratch.
What's in the box
Despite the box size, there's nothing much inside the box except for packets and packets of LEGO you need to build.
If you're hoping for a huge 'Congratulations for getting this LEGO set' certificate or a Super Mario poster, sorry; no cigar.
There are a total of 21 packets of LEGO bricks in the box.
The packets are divided into two: packets one to eight for the NES system itself, and packets nine to 21 for the TV set.
There are also two coffee table-sized instruction booklets, both about 100-plus pages.
So yeah, one look at the instruction booklets and you'll know how much time you'll be spending on the LEGO NES set.
Building the NES set
To fully build the NES set, you'll need to assemble eight packets.
The assembly for the the NES set was pretty simple for us, and if you follow the instruction booklet to a T, you wouldn't have many problems building the set.
The instructions in the booklets were easy to follow as well, although we got one minor complaint: sometimes, it's a little bit hard to tell where new pieces are supposed to go due to the colour of the bricks, so LEGO, maybe help us out a little next time?
The building of the base of the NES set was straightforward: the pieces were big enough for you to distinguish one between another.
It is when you're done with the base and you go into the inner workings of the set is when things get a little more complicated.
The set boasts a spring-loaded mechanism inside the system (for you to slide in the cartridge), and the smaller pieces you need to build the mechanism and its surrounding areas require a little bit of patience and very delicate fingers.
As some of the pieces were really small and the spots you need to place them in were even smaller, there were a few times where we dropped the tiny piece into the base of the set, and that required some disassembling and angry shaking to get it out.
(We almost rage quit like how we did after dying at the Airship stage of 'Super Mario Bros 3' for the 19th time)
So, considered yourself warned.
Once you get past that, building the outer shell was as easy as 1 Up, 2 Up and 3 Up. The outer shell uses medium to large-sized smooth pieces, and it's as easy as just snapping them into place.
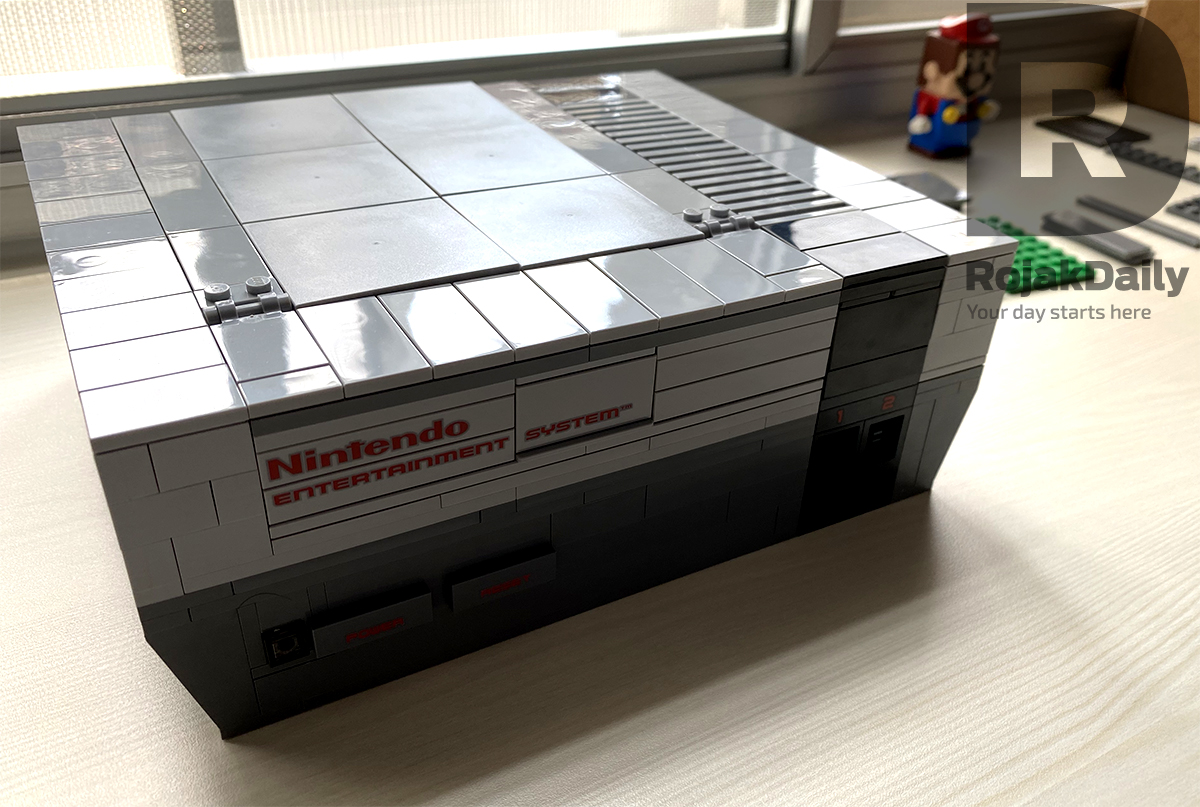
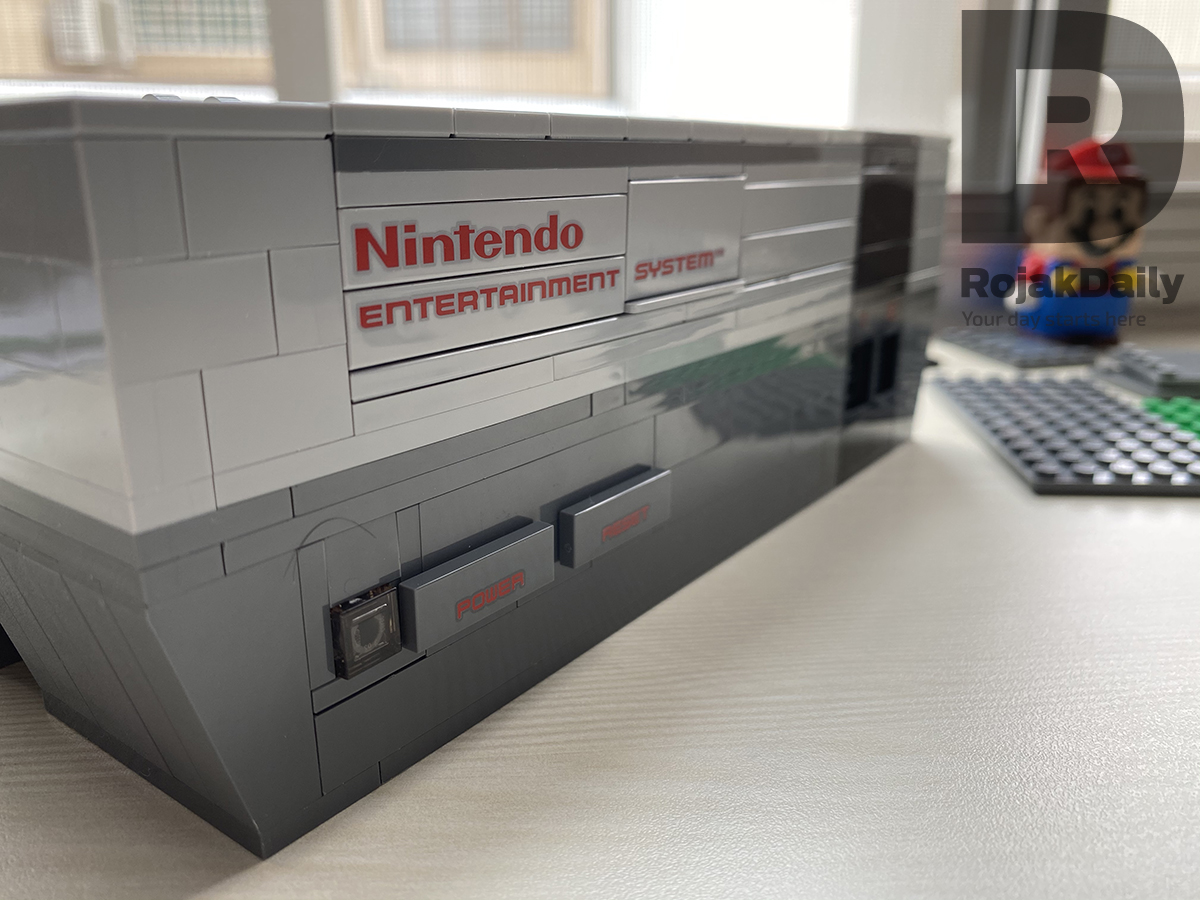
Here's what the finished product looks like:
We absolutely love the attention to detail that goes into the LEGO set.
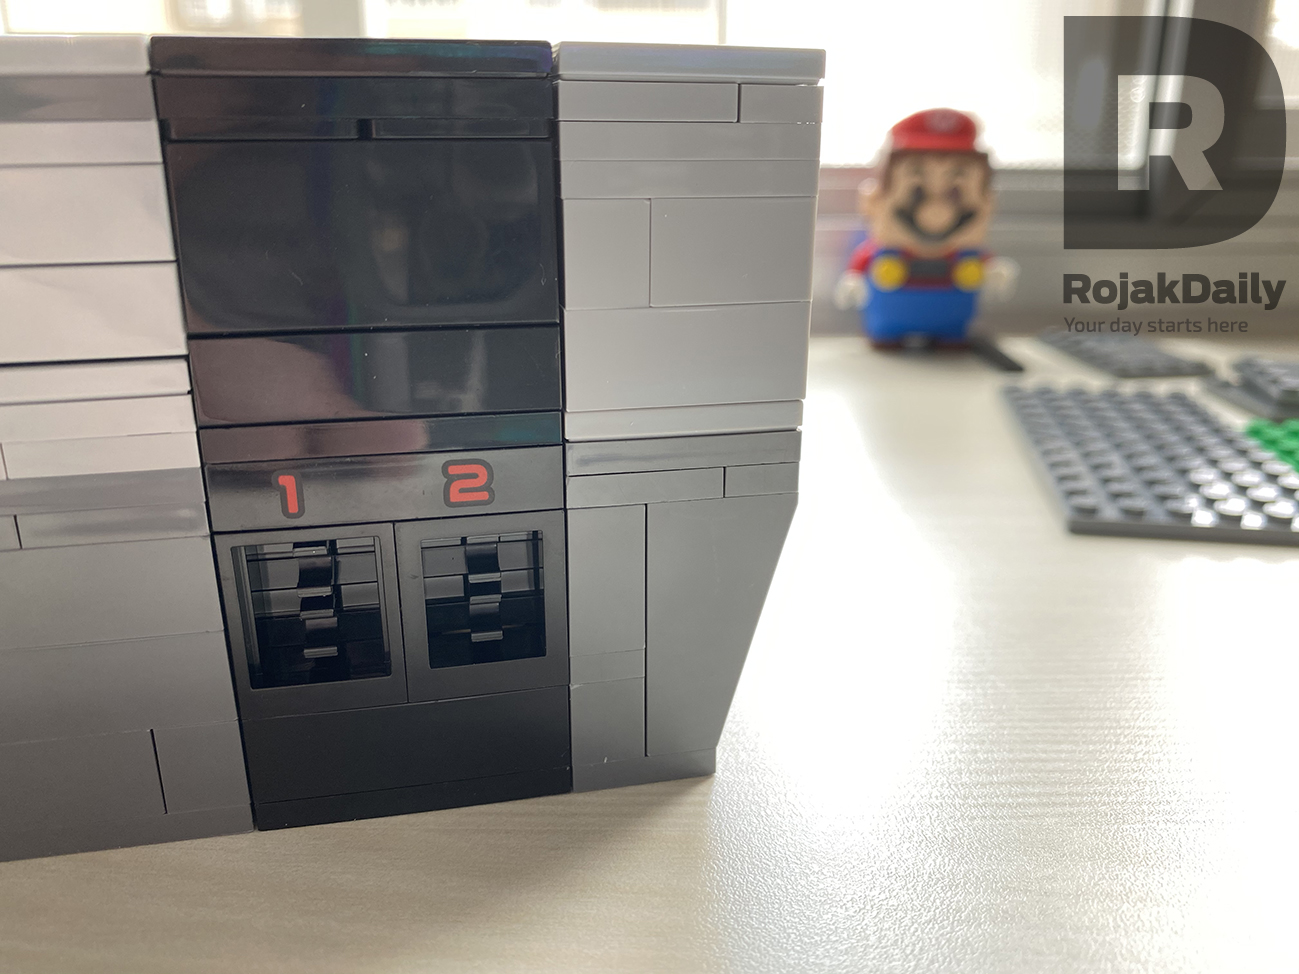
From the 'Nintendo Entertainment System' plaque at the front, the 'Power' and 'Reset' buttons right below it and the controller input slots at the bottom, the LEGO set, once built, looks exactly like the real thing.
There is also an 'Audio' and 'Video' jack at the back of the unit - just like the real NES.
The entire set is not really that heavy, and when you hold it in your hand, you can't help but marvel at it, because it's solidly built and it just looks too darn good.
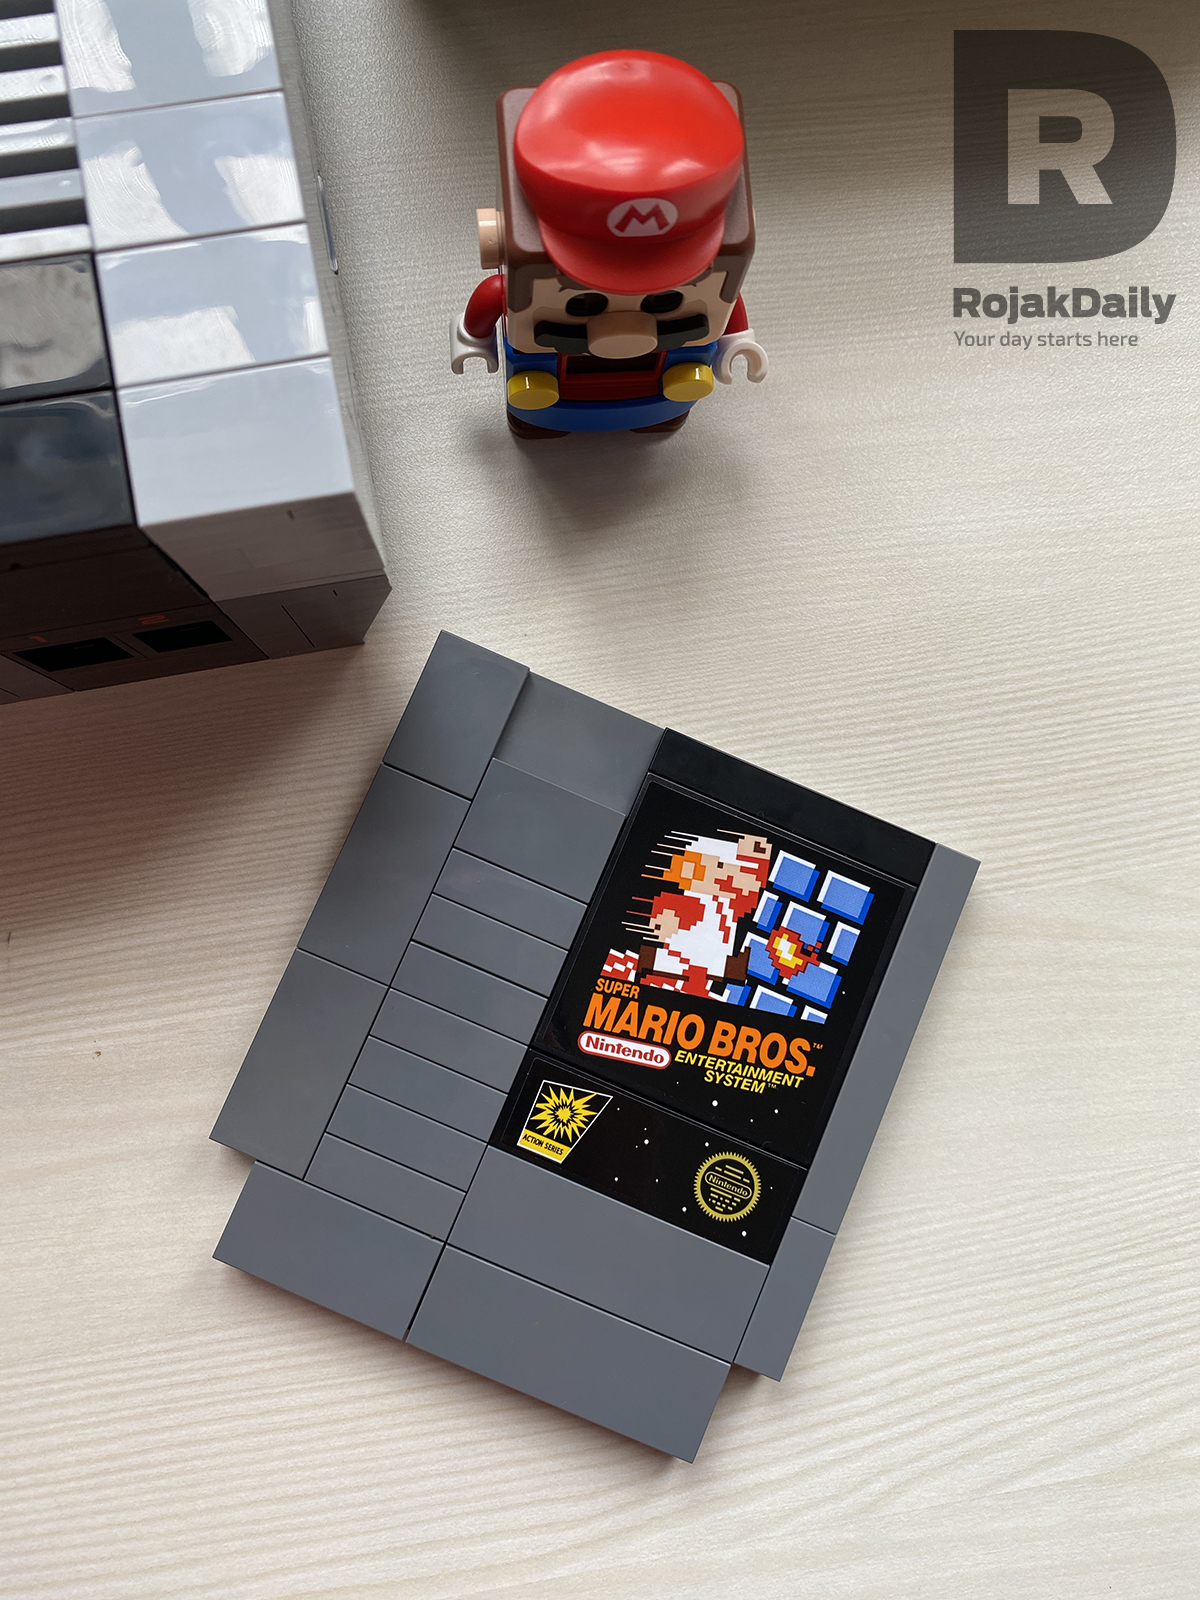
Next up is the video game cartridge, also known as the Game Pak, we all are familiar with.
This is perhaps the easiest thing to build, as it requires only one bag (Bag 6) and the pieces are medium to big size. There's basically nothing much to assemble, as all you need to do is just to snap the big pieces into place.
Once that's done, you just need to stick the 'Super Mario Bros' sticker (which we absolutely love 'cos it resembles the original 'Super Mario Bros' graphics) on the interface and voila, you have your Game Pak.
The coolest part is that you can flip the front part of the NES unit open, and slot the cartridge in like you would the real thing.
Once it's fully slotted in, you can close the flap and proceed to imagine yourself playing 'Super Mario Bros' like back when you're a kid.
Now we've come to the last piece of the puzzle: building the iconic NES controller.
The controller has more pieces than the NES cartridge, and it's not as easy to assemble as the cartridge because it has tonnes of small little pieces, but it is still pretty straight forward.
But once it's fully assembled, you can see that the cotroller is totally the doppleganger of the real thing: down to the D-pad, the 'Select' and 'Start' button as well as the recognisable 'A' and 'B' red buttons.
To be honest, you could even fool people into thinking that that's the real NES controller.
You can then connect the controller to the NES unit with a built in rubber cable and hand-built connector. Brilliant!
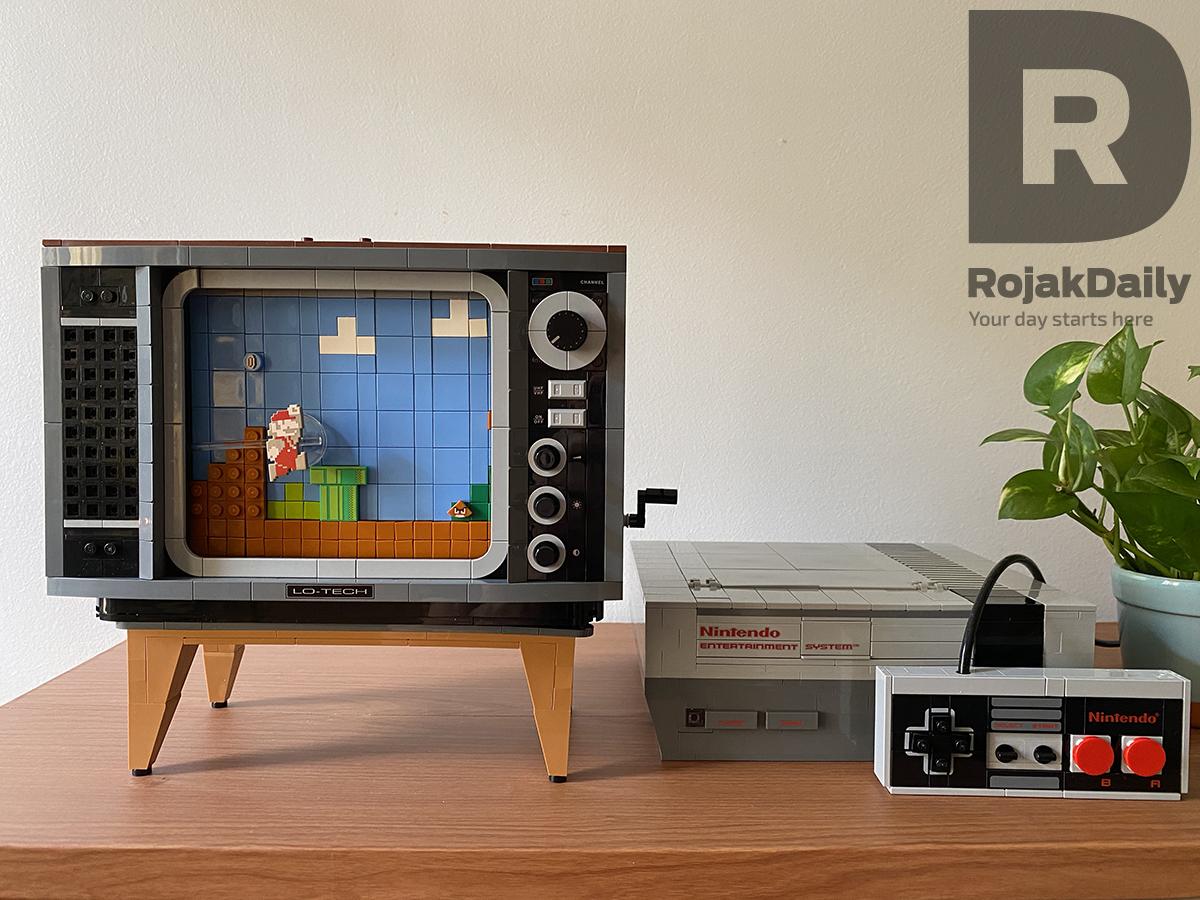
Here's what the entire NES set looks like once you're done with the whole thing.
Gorgeous, isn't it?
In total, building the entire NES set set took us four hours, give or take.
Building the TV set
Now that you're done with the NES set (congrats, you!), it is time to turn your attention to the real monster: the retro TV set.The reason why we say the TV set is the real 'monster' is because 1) it has more packets of various sizes compared to the NES unit and 2) it has a lot of small moving parts.
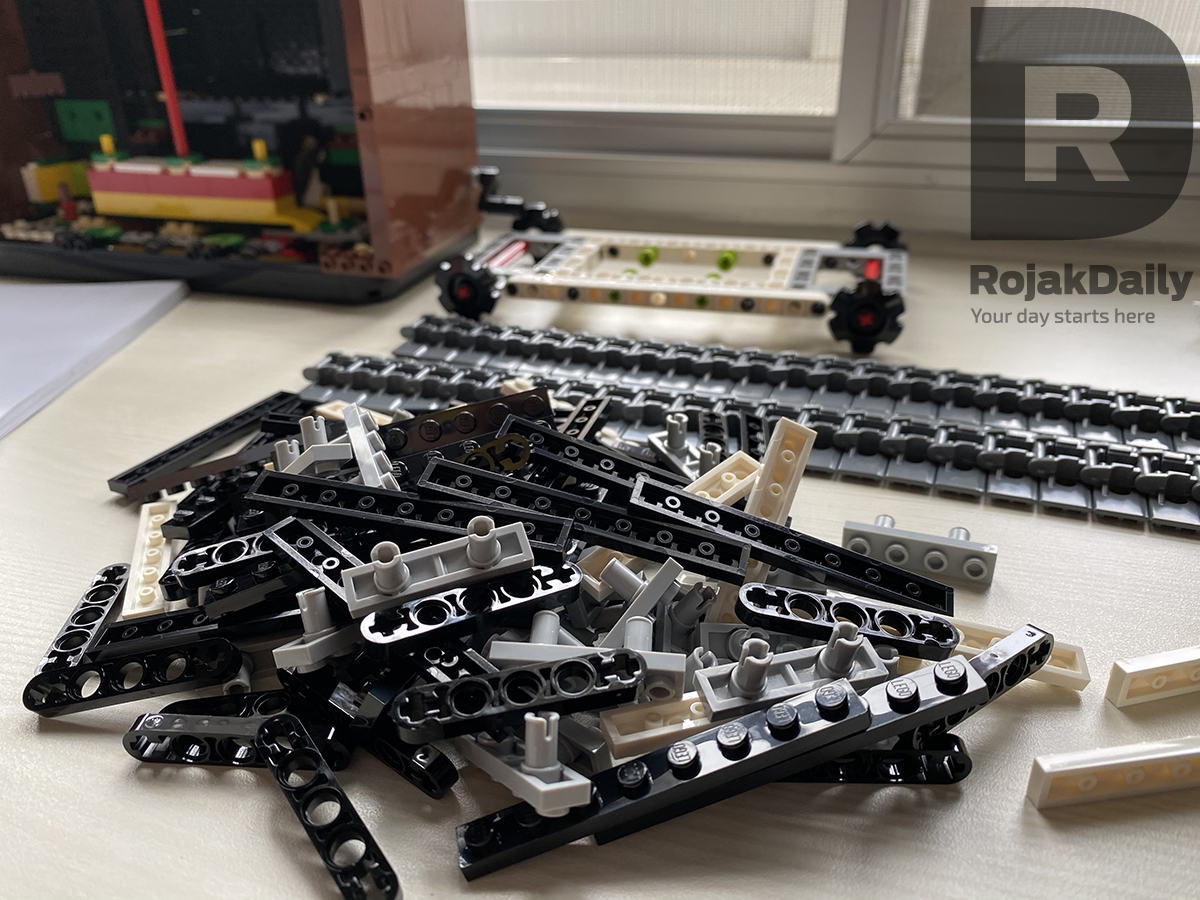
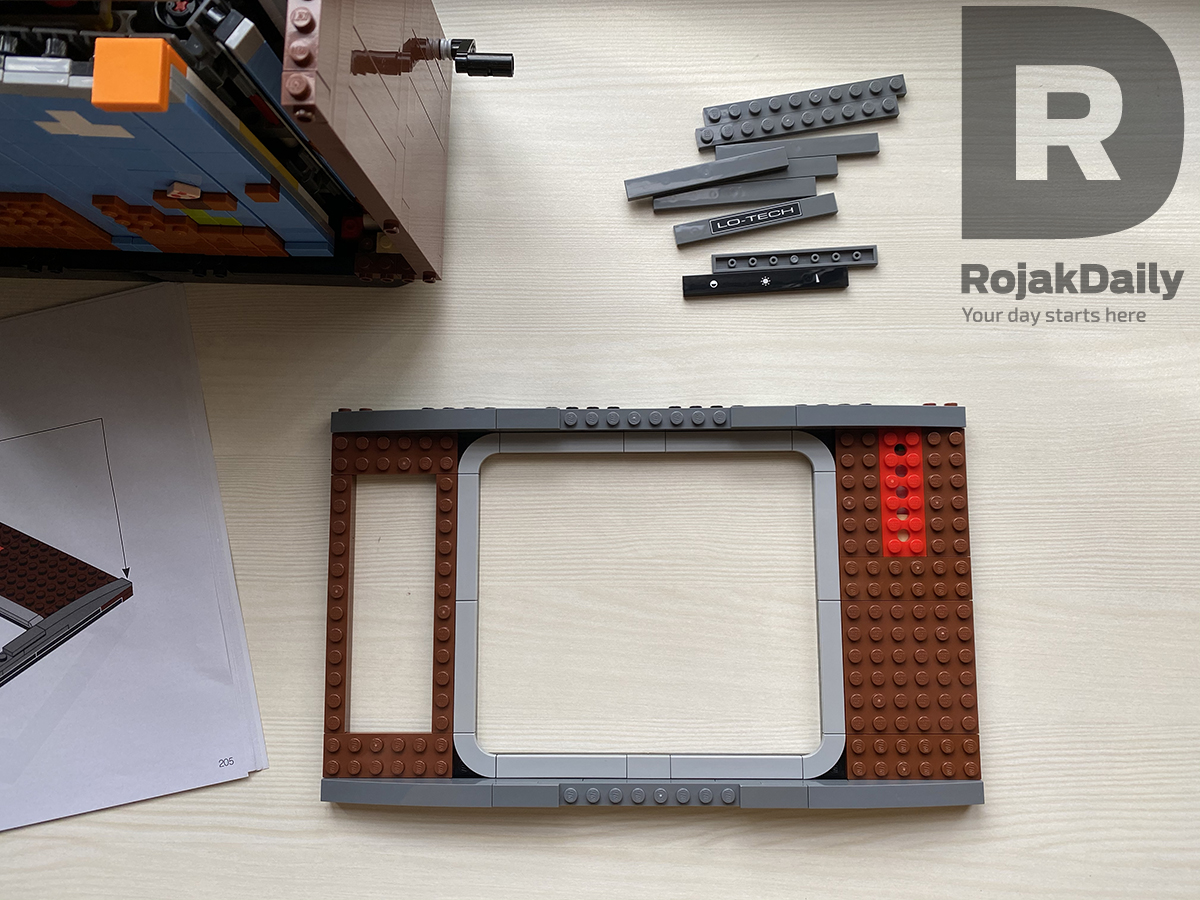
The first few packets involves building the base of the TV set, as well as the moving mechanisims, so you'll be assembling a lot of turn gears and little wheels.
The process is not very hard -- again, follow the instruction booklet and you'll do fine -- but the difficulty level is definitely higher compared to the NES unit due to the amount of small parts you'll find in the first few packets.
But don't worry; your nightmare will end after just four packets, as the subsequent packets are super easy because now, you'll start building the shell of the TV set instead.
So, you can expect to find lots of big, easy-to-distinguish pieces.
You'll even get to attach the antenna to your TV set too.
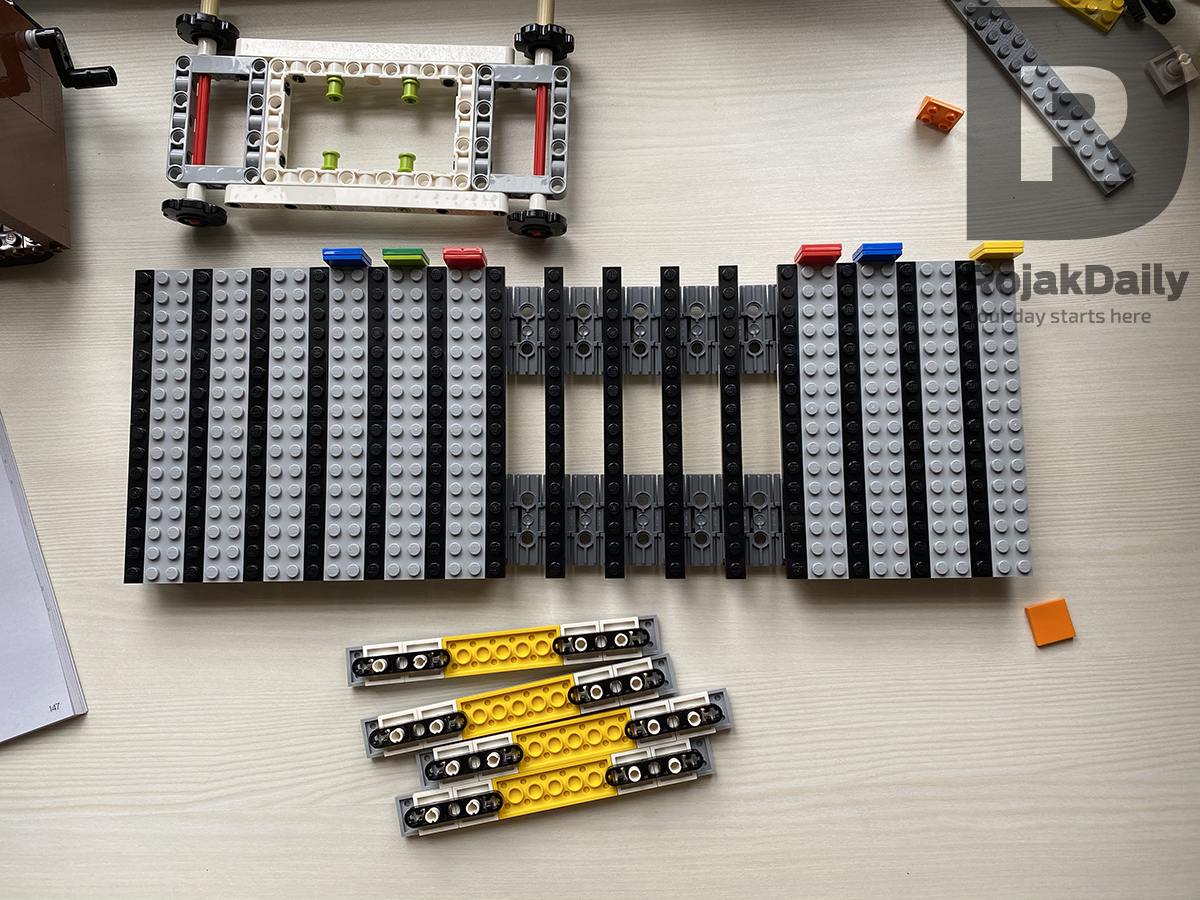
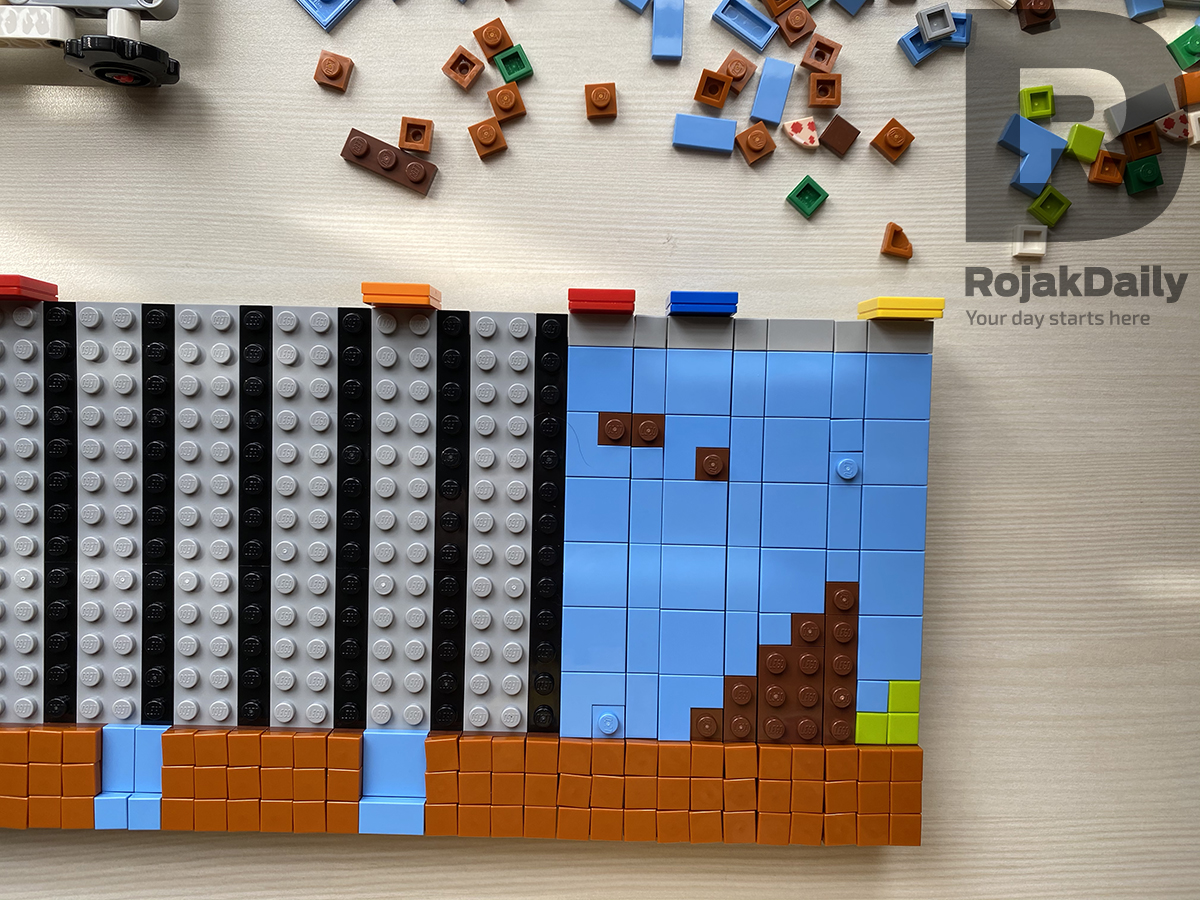
Now that you've got the base of your TV ready, now comes the fun part: building the scrolling 'screen' with the 2D Mario!
The pieces for the TV 'screen' is pretty medium to big-sized, so it's not really that hard to build.
However, this is also where things get a little 'boring', as you need a lot of patience because you'll be doing the exact same thing over and over and over again.
You'll start by building a sort of 'roller' that acts as the base for the scrolling screen, and it's harder than it looks, in the sense that you'll get a little bit bored because it will seem like you're building the exact same thing and you're not going anywhere.
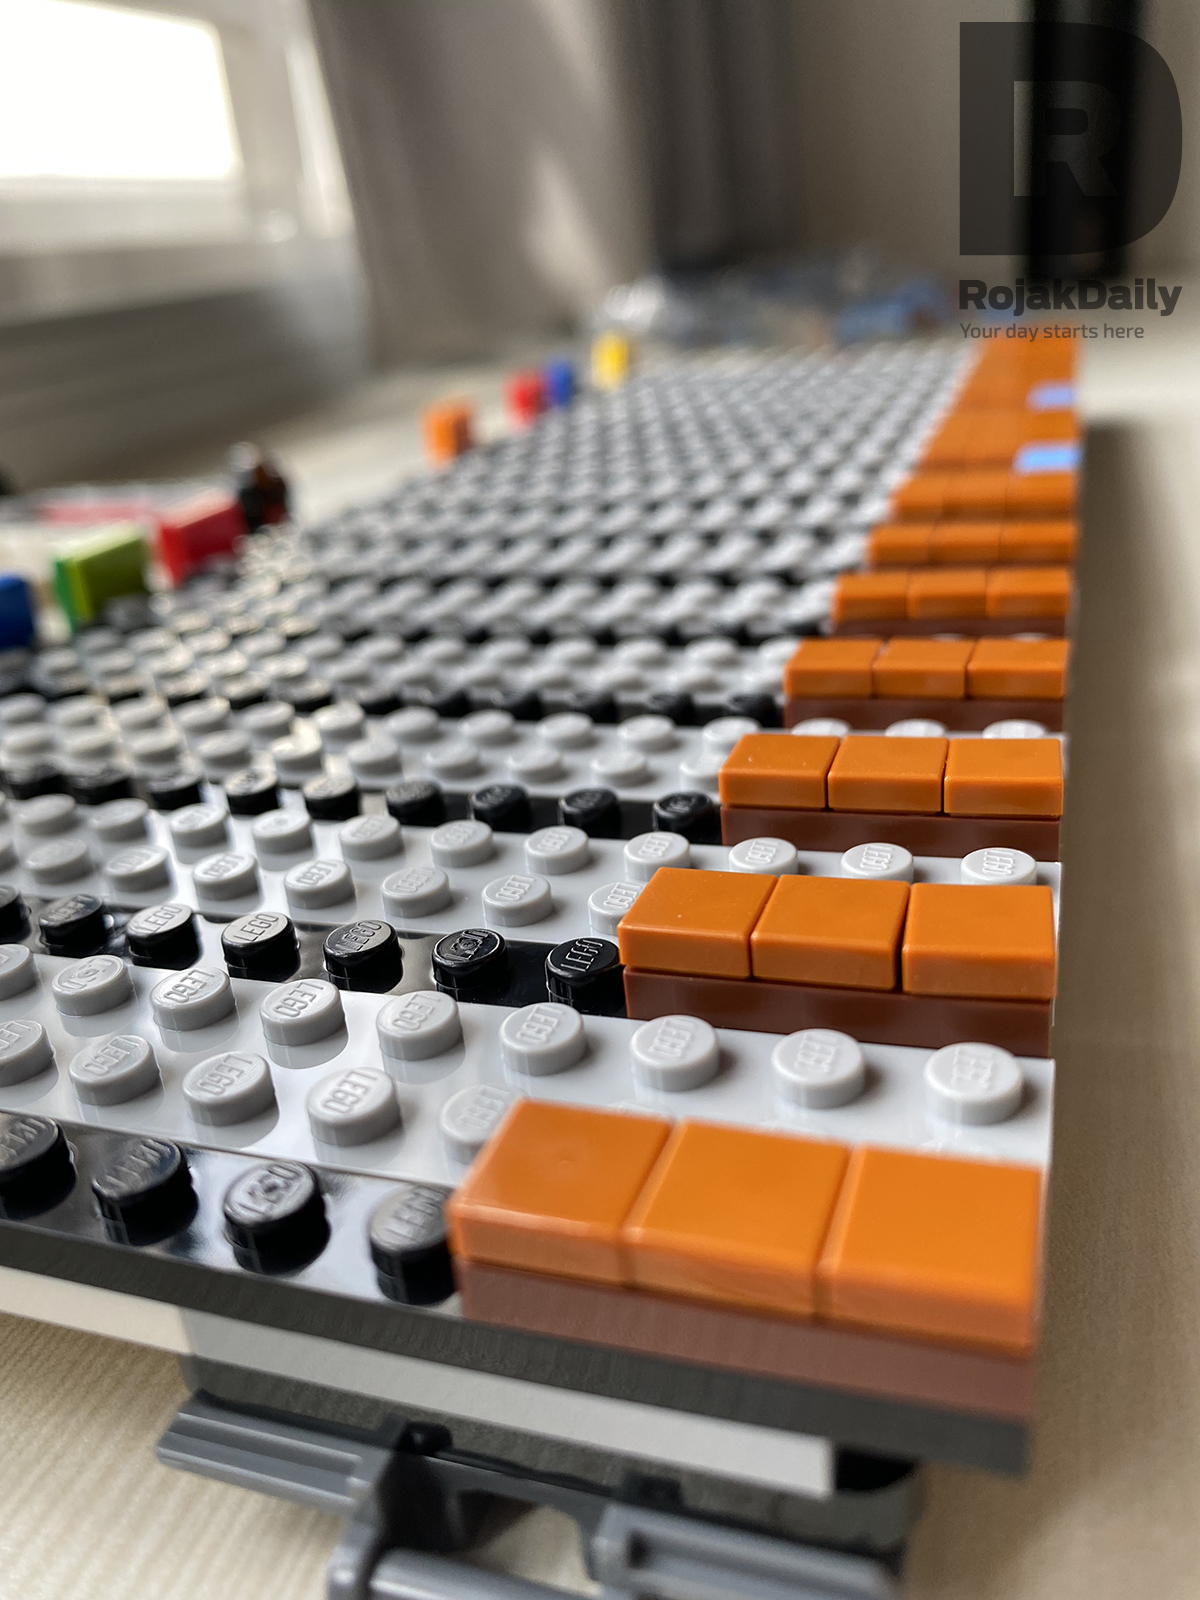
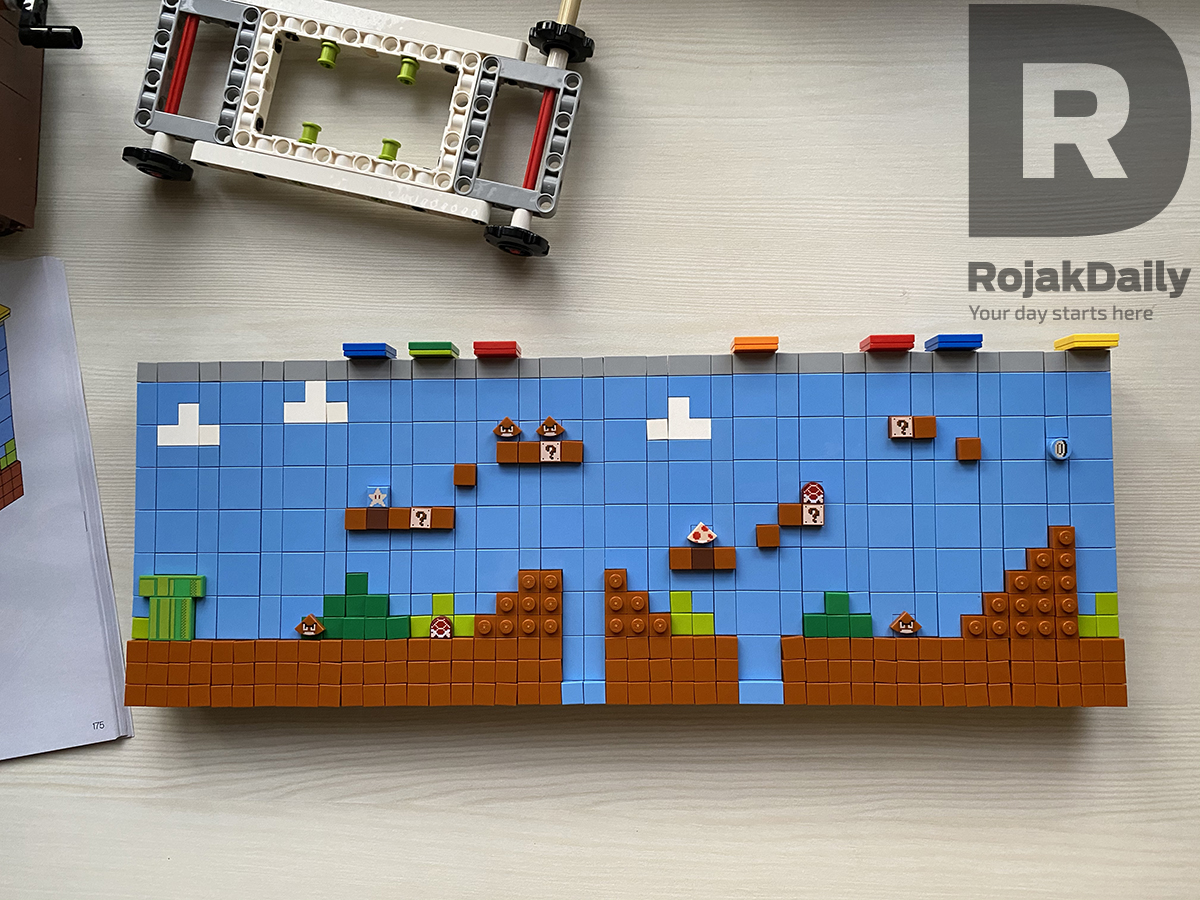
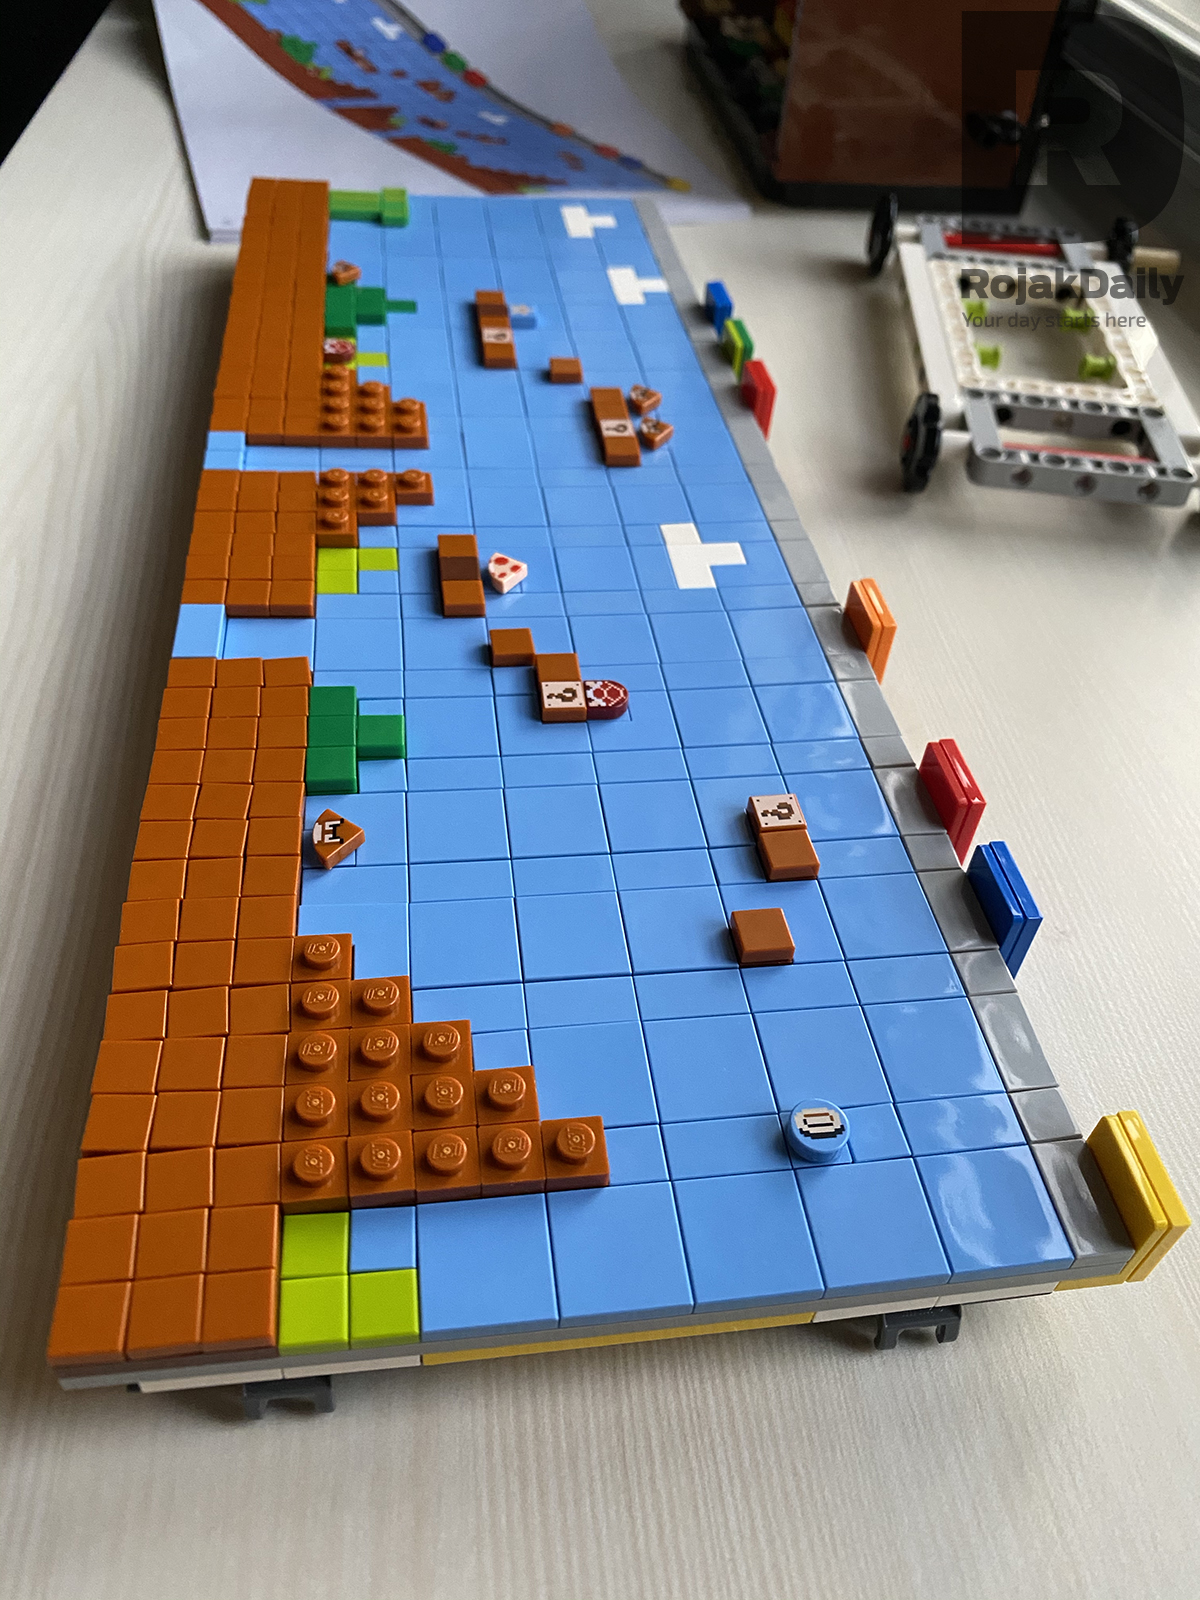
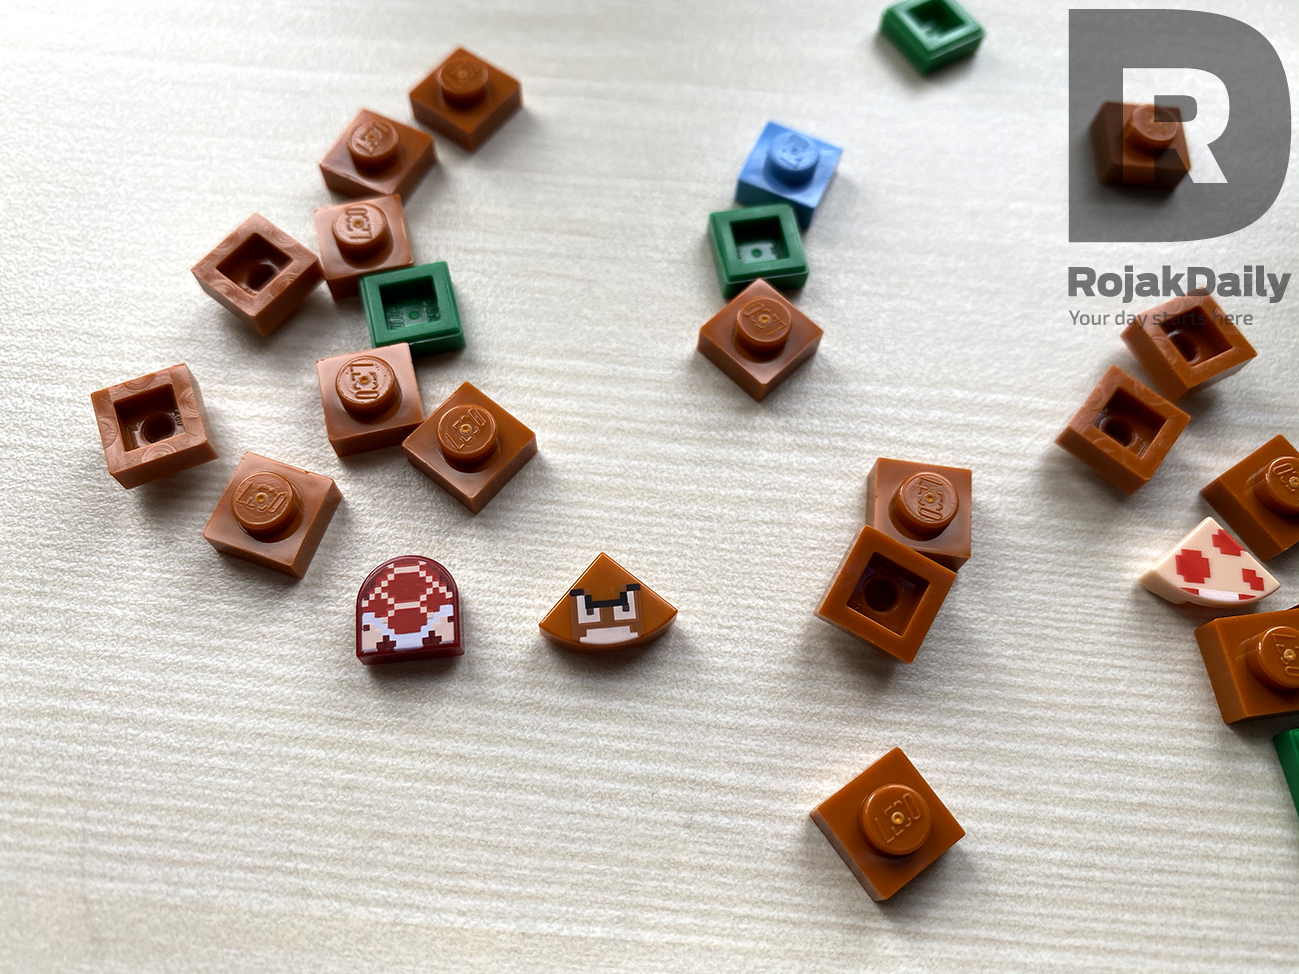
Once that you've fully assembled the moving screen, comes the most painstaking and mundane part: snapping in the small pieces that make up the 'graphics' of one of the 'Super Mario Bros' stages in the video game.
And we're talking about snapping in those 0.5cm tiles one by one and let us warn you, the whole process will last you 45 minutes or so.
If you're someone who has little to no patience, this section will definitely test it.
We would be lying if we said we didn't take a short nap halfway into building the screen.
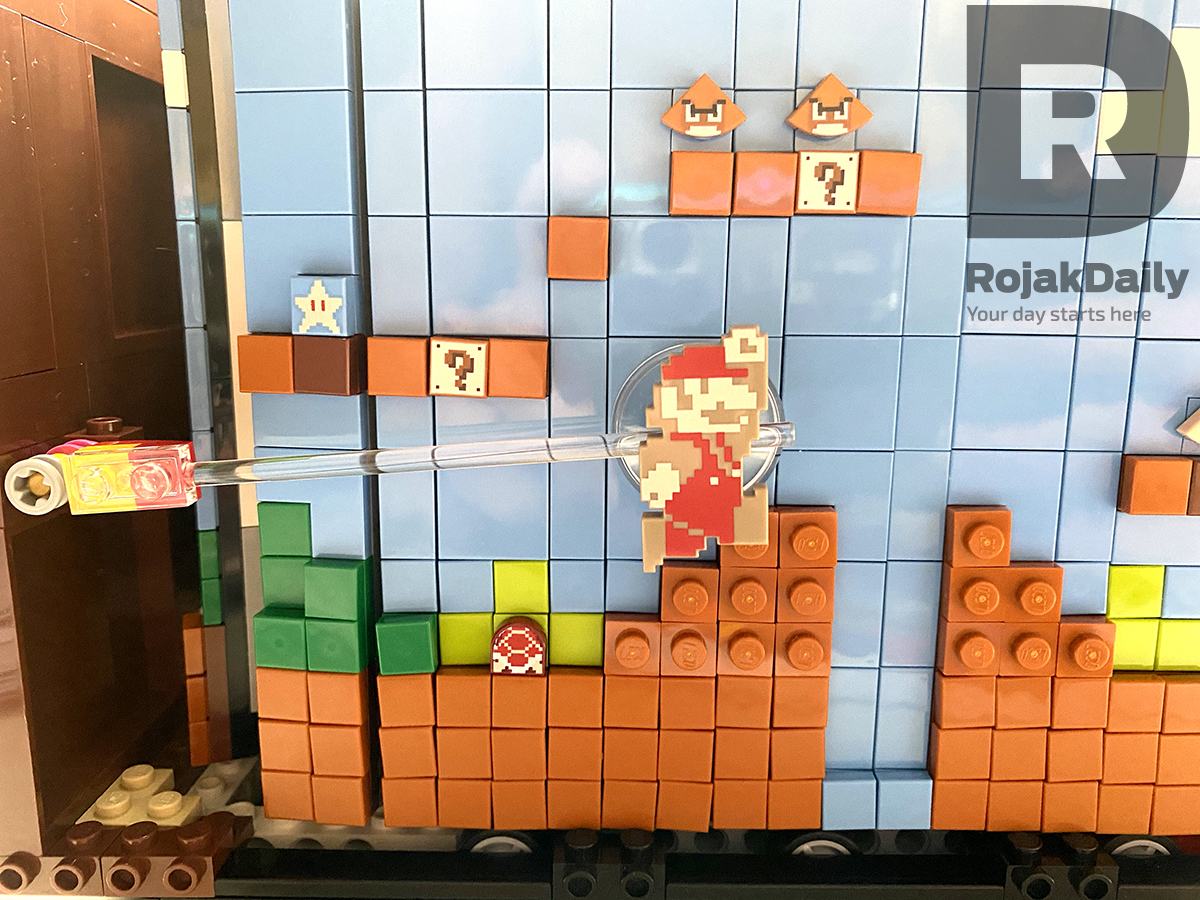
But of course, patience is a virtue, and once you're done with the entire screen, you'll feel a sense of accomplishment because look at how pretty it is:
Bonus: how cute is this little Goomba tile?
Now that you've got your moving screen, it's time to put your screen into the TV set.
You do that by folding and wrapping the screen like a roti canai (we're not kidding) around a white, car-like contraption you built earlier, which serves as the mechanism that allows you to turn the screen when you move the turn wheel.
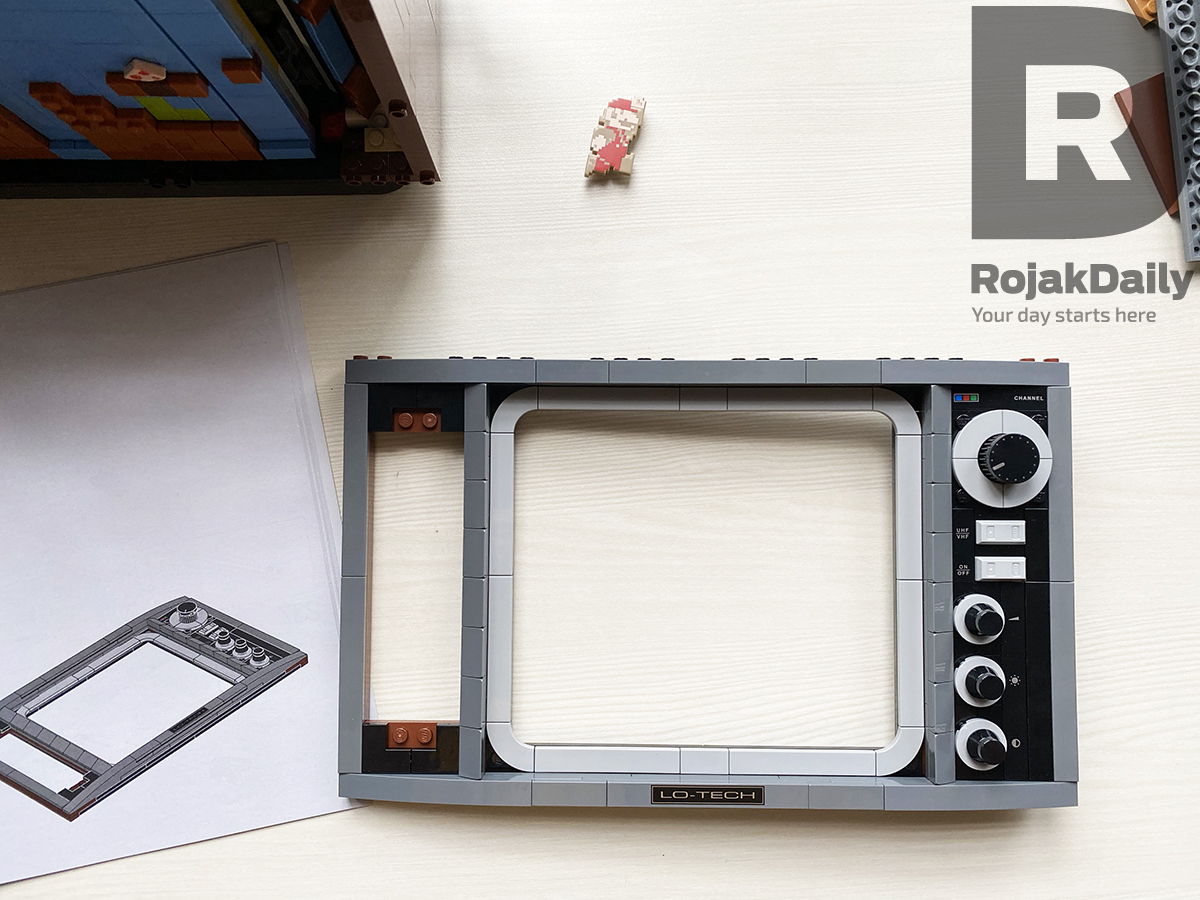
Once you've placed your screen into the TV box, now you have to build the rest of the TV set, starting with the front frame of the TV.
Thankfully, this section is really simple and straight forward, because we have a feeling LEGO doesn't want you to fall asleep again.
We were really impressed with the level of details displayed on the front frame of the TV.
It has knobs, volume up and down buttons and other switches you'll typically find in a retro TV.
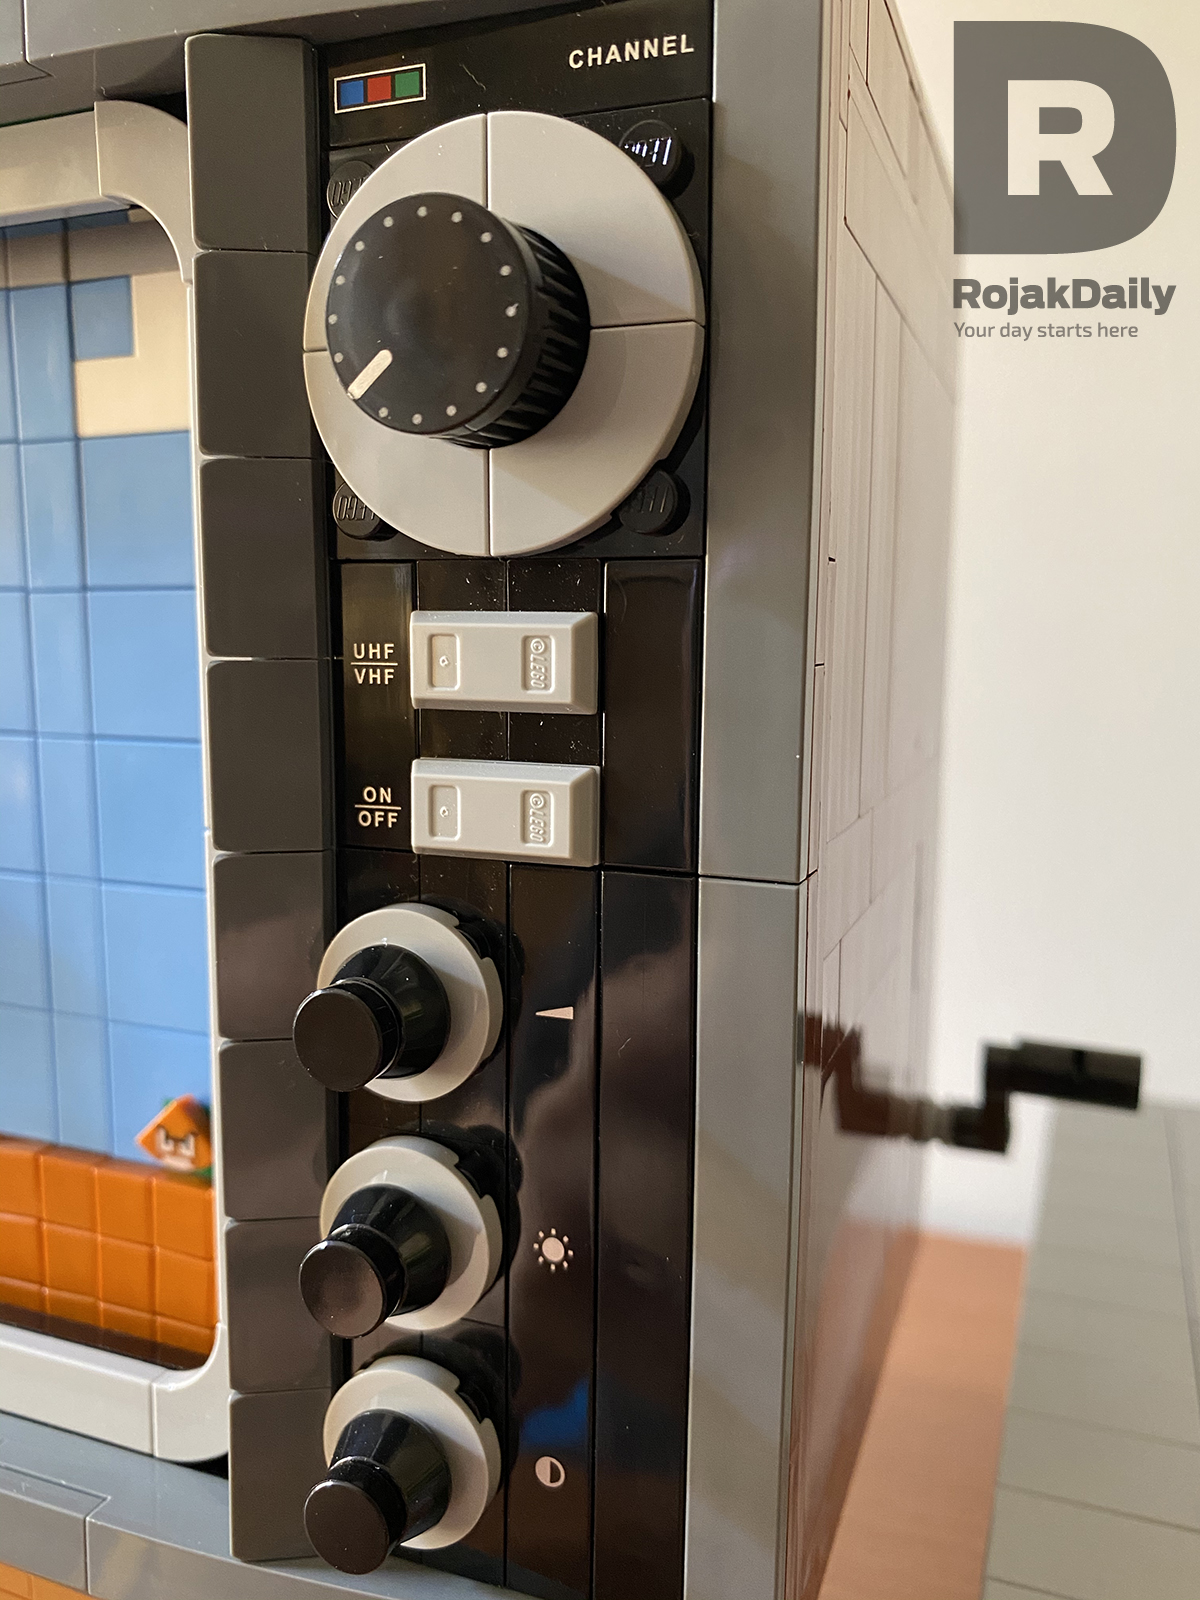
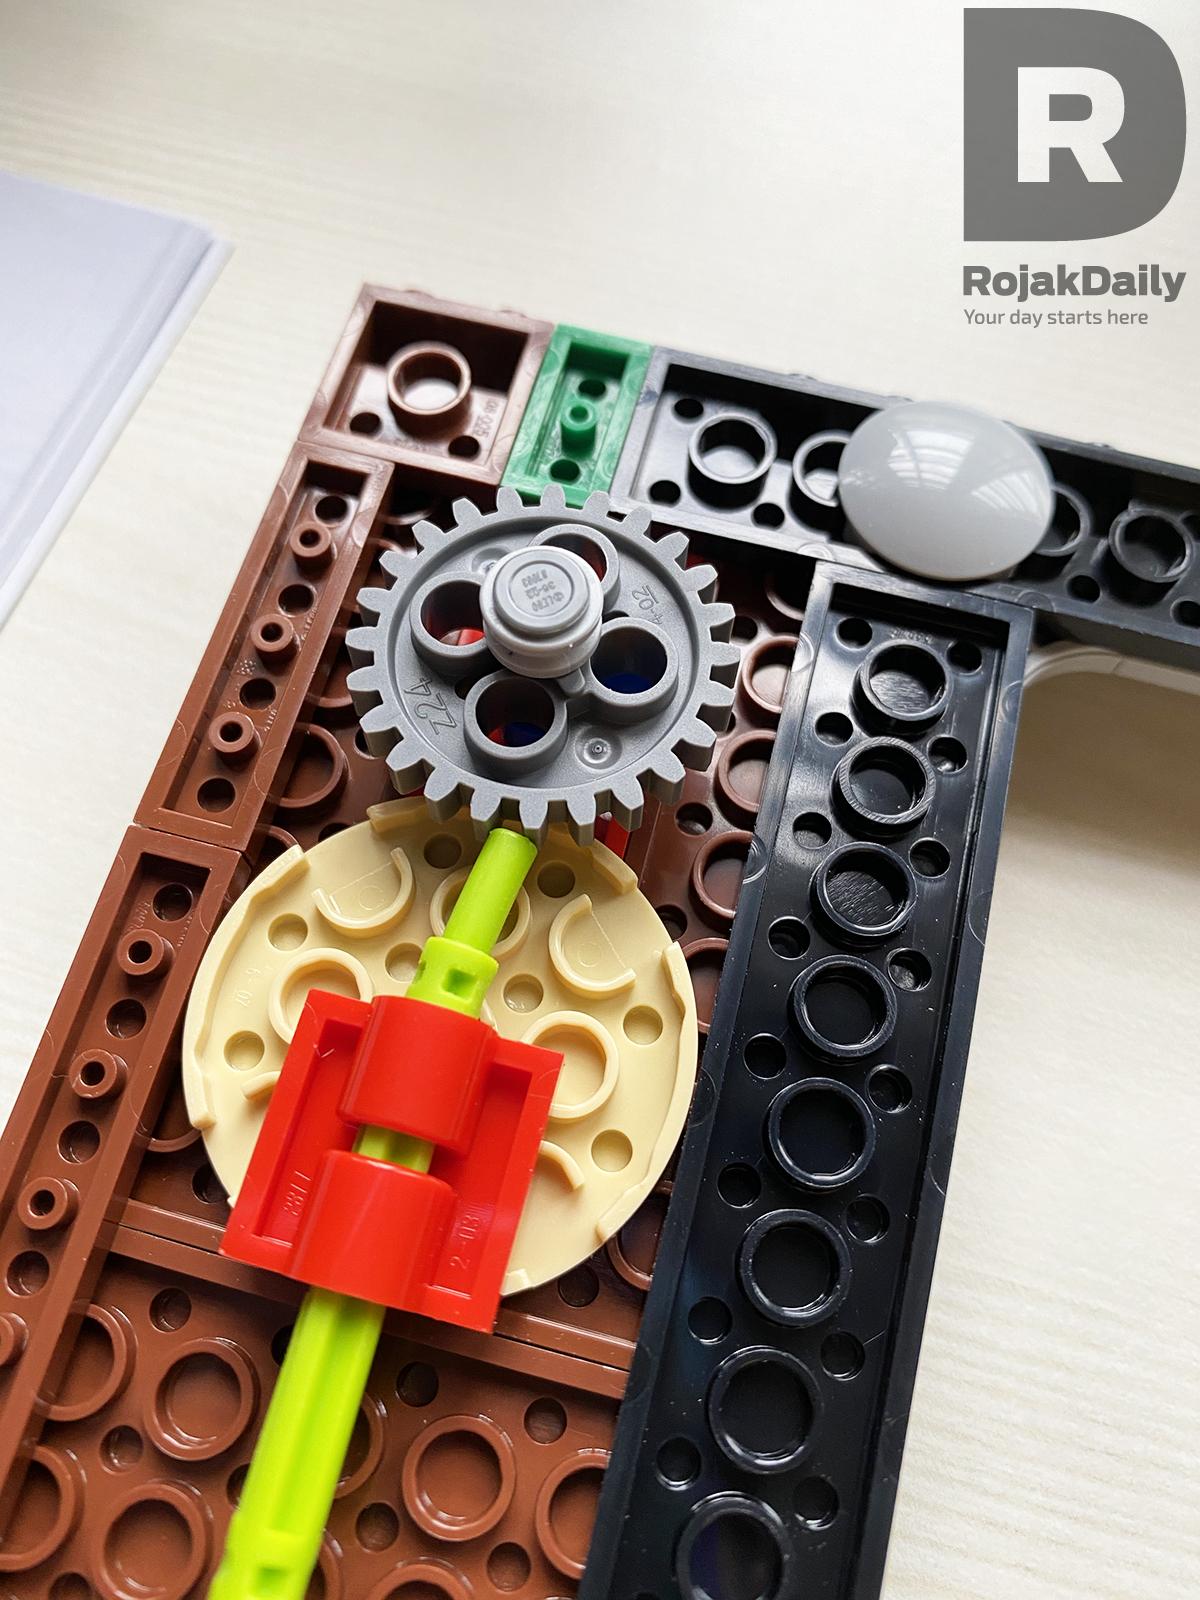
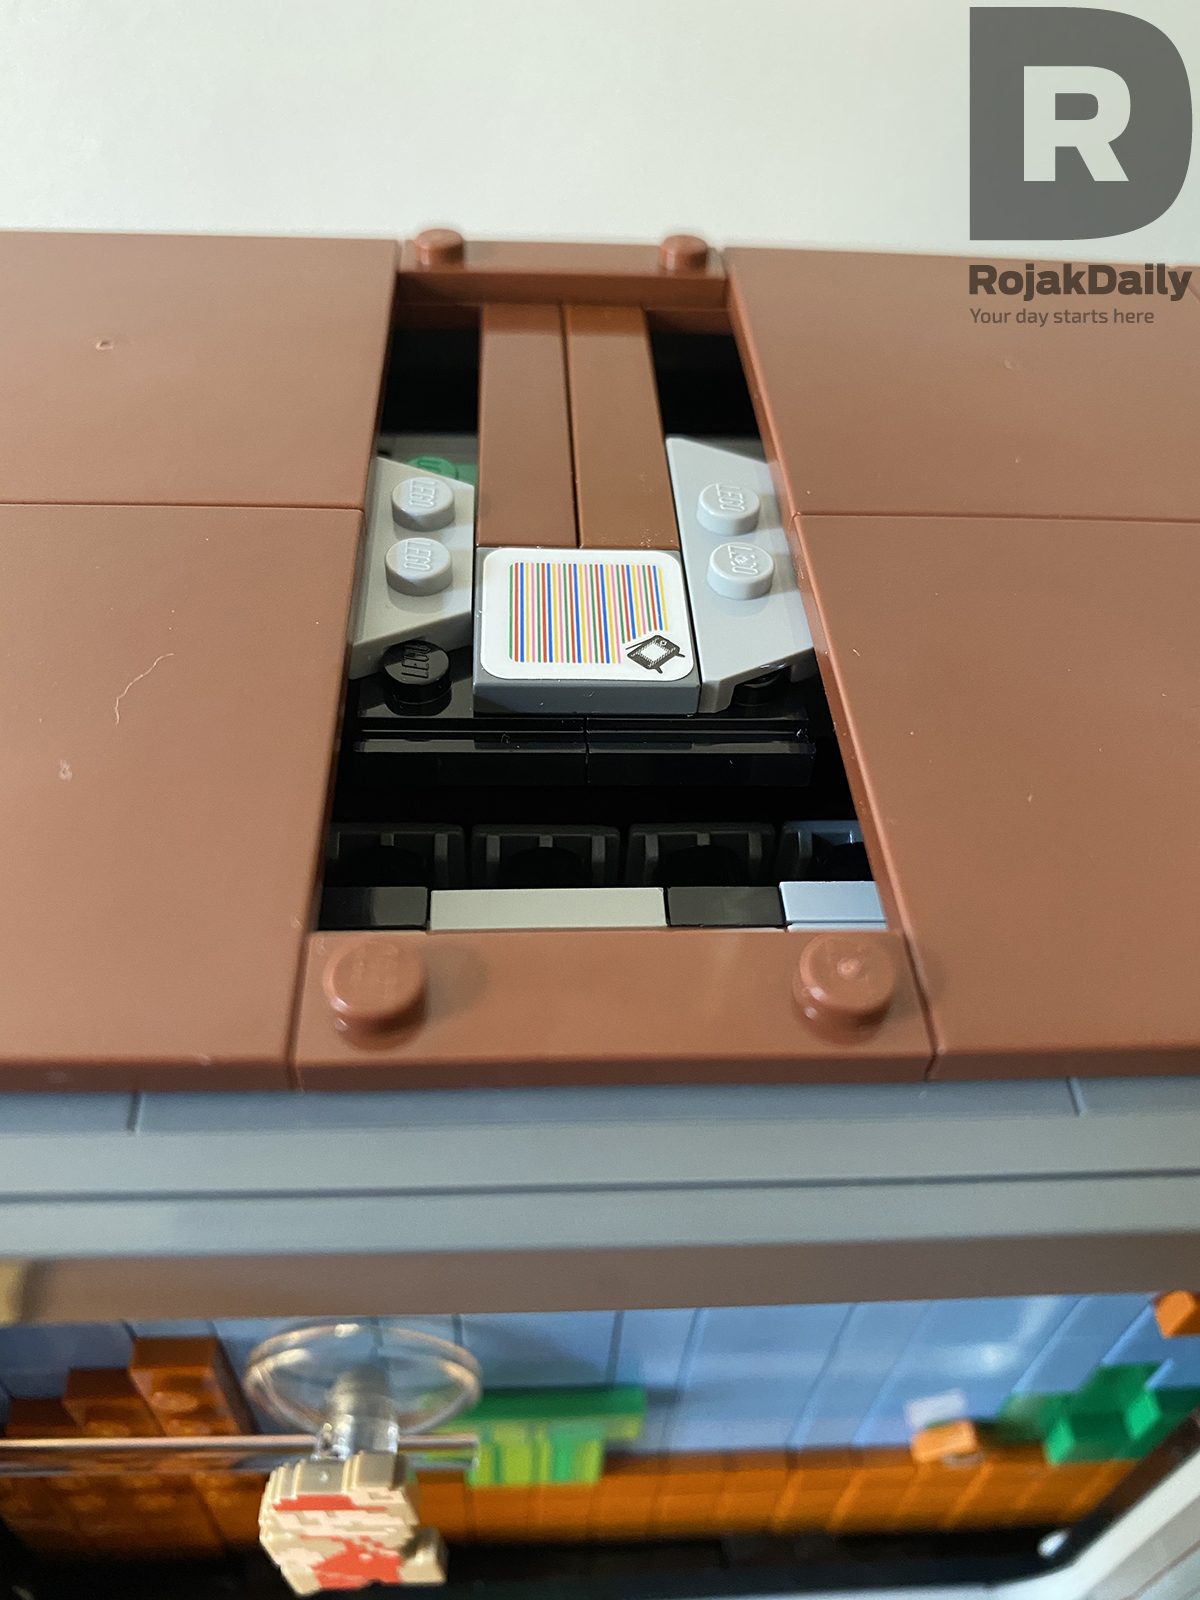
But the one detail that impressed us the most is that the bigger 'Channel Select' knob at the top right hand corner is fully functional - as in, you can turn it as if you're selecting a channel and when you do that, it makes a very satisfying clicking sound like it would when you turn the knob on a real retro TV.
The clicking sound is achieved thanks to this little green plastic tube you attach to the turn gear that connects to the big knob in front part of the TV.
So, everytime you turn the big knob on the front of the TV, the turn gear will hit the little plastic tube, and that's where the 'click' sound comes from.
Very clever indeed. We love it!
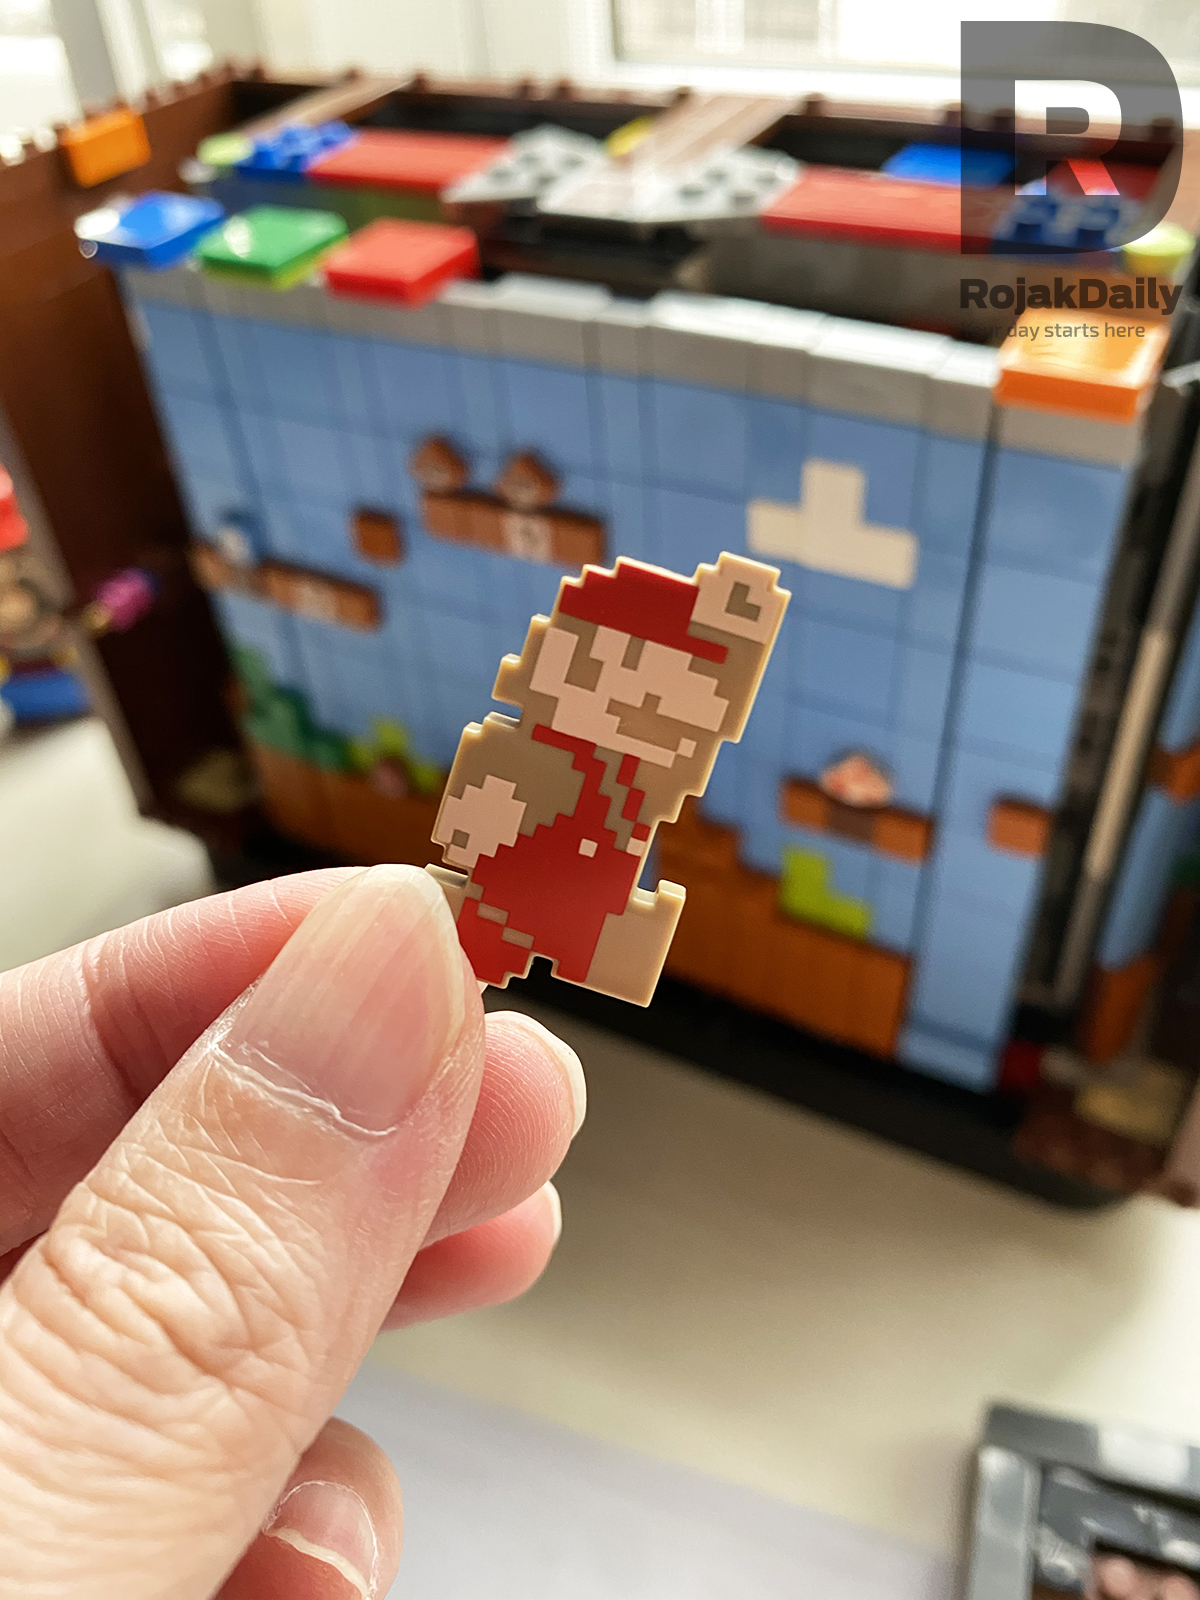
Before you attach the frame to the TV box, you will first need to install the cute 8-bit Mario onto the screen first.
Yes, this cute little Mario:
To do that, you need to attach the Mario onto a transparent stick, and mount it to the side of the TV box.
The stick acts as a holder for the Mario when you turn the turn handle at the side of the TV box, so it will make it seem like Mario is running and jumping over hurdles like he would in the original video game.
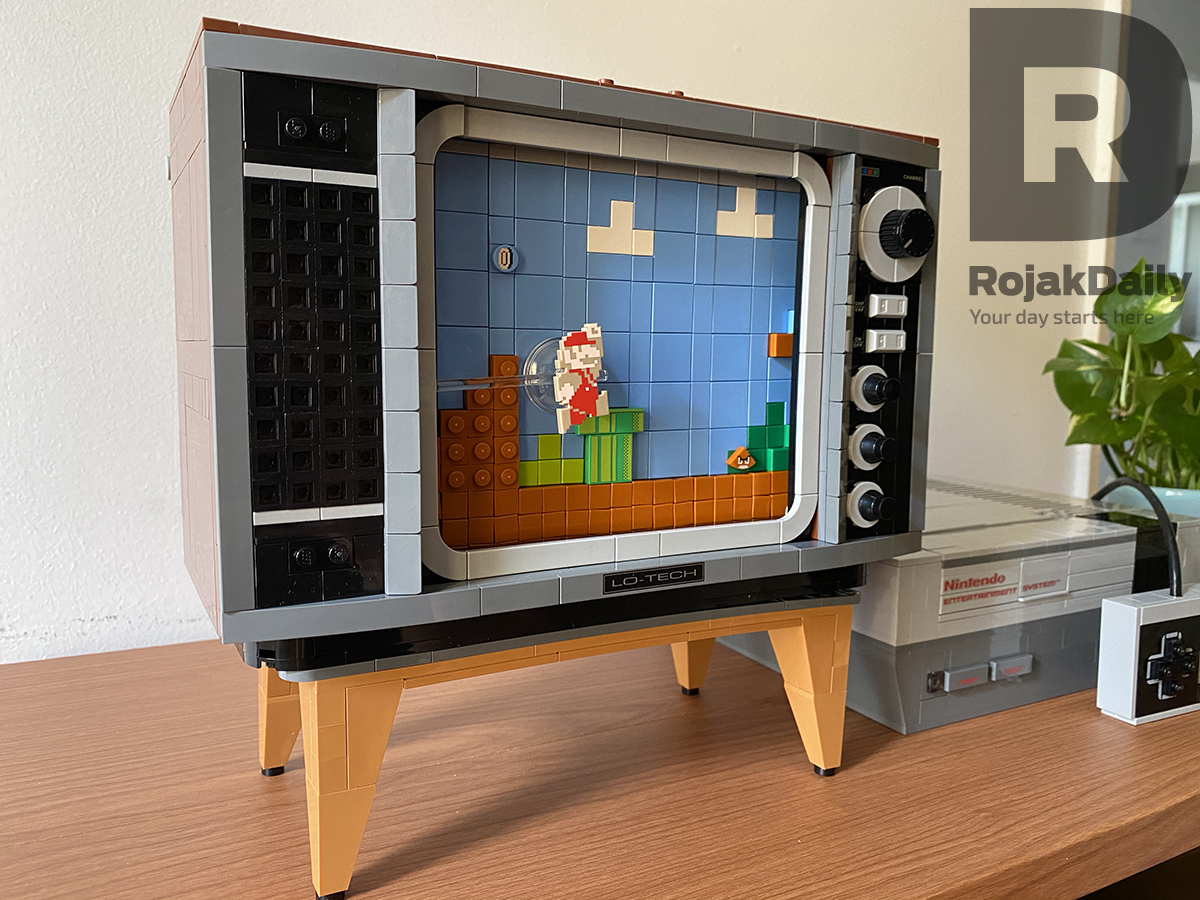
Once you're done with that, all you need to put on the finishing touches: that means installing the TV box stand, snapping the TV frame into place and voila, your retro TV set is now complete!
And here's a cool little Easter Egg: if you own the interactive Mario from the Super Mario Starter Course LEGO playset (you can read more about it here), you can have it give you some background music too.
All you have to do is pop out a section on top of the retro TV box to reveal a QR code (yes, the set has a special QR code), place the interactive Mario on top of the code and the Mario will light up and PLAY THE ORIGINAL MARIO THEME SONG!
How incredibly cool is that?
The LEGO NES set is like a gift that keeps on giving, and we can honestly say that it's one of the best LEGO playsets that we've ever had the chance of building.
In total, we spent a good eight hours building the entire set. There were some frustrating bits, there were also some boring bits, but in all, it was a fun experience.
We absolutely love LEGO's attention to details when it comes to the retro TV set, as well as the Nintendo Entertainment System.
When you put both of them together, it definitely will be the centerpiece of your entire LEGO collection.
You can now pick up the LEGO NES set for RM949 at LEGO Certified Stores and LEGOLAND in Malaysia.
BRB, we're going to play with the set somemore because it's super cool.